Creating memories in the kitchen...One meal at a time.

Thursday, April 30, 2009

Easy Crescent Rolls


I think it is impossible to have too many roll recipes. I have a few that I absolutely love but it's always nice to do something different. This was my first attempt at crescent rolls. They were so simple and pretty. They also tasted delicious. Extra tender, buttery and slightly sweet. Now unfortunately I will be spoiled and not want to eat store bought ever again. This recipe also gives you the option of refrigerating them for up to 24 hours.


Easy Crescent Rolls Cook's Country


7 tablespoons unsalted butter , melted and cooled slightly, plus 1 tablespoon unsalted butter, softened
1/2 cup half-and-half , heated to 110 degrees
1 tablespoon instant or rapid-rise yeast
1/4 cup sugar
2 large eggs , 1 whole and 1 separated
2 1/2 cups all-purpose flour
1 1/4 teaspoons salt
1 teaspoon water
1. Adjust oven rack to middle position and heat oven to 200 degrees. When oven reaches 200 degrees, shut oven off. Line baking sheet with parchment paper. Grease large bowl.
2. Whisk melted butter, half-and-half, yeast, and 1 teaspoon sugar in large liquid measuring cup until yeast dissolves, then whisk in 1 whole egg and 1 egg yolk. In bowl of standing mixer fitted with dough hook, mix flour, remaining sugar, and 1 teaspoon salt until combined. With mixer on low, add warm half-and-half mixture in steady stream and mix until dough comes together, about 1 minute. Increase speed to medium and mix until dough is smooth and comes away from sides of bowl, about 6 minutes. Turn dough out onto clean surface and knead to form smooth, round ball. Transfer dough to prepared bowl, cover with plastic, and place in warm oven. Let rise until doubled in size, about 1 hour.
3. Turn dough out onto lightly floured surface and roll into 12-inch circle. Spread softened butter over dough, sprinkle with remaining salt and using pizza cutter, cut dough into 12 wedges, roll each wedge, and arrange (with pointed tip of dough underneath each roll) on prepared baking sheet. Cover loosely with plastic wrap and return to oven until doubled in size, about 1 hour. (At this point, rolls can be refrigerated for up to 24 hours.)
4. Remove rolls from oven and discard plastic wrap; heat oven to 350 degrees. Whisk remaining egg white and water in small bowl. Brush each roll twice with egg white mixture and bake until golden brown, about 20 minutes, rotating baking sheet halfway through cooking. Cool rolls on baking sheet 10 minutes. Serve. (Once completely cool, rolls can be stored in airtight container at room temperature for 2 days.) Makes 12 rolls


Pin It!

Toasted Almond Lemon Bars


I recently joined a little online club called the Cookie Carnival. Every month 1 person takes a turn choosing a recipe and we all bake it and post it. This month's recipe was chosen by Holly of phemomenon.blogspot.com. She has a great blog. I was excited when I heard the recipe she chose was Toasted Almond Lemon Bars. I really like lemon bars and haven't made them in awhile. I thoroughly enjoyed them. The shortbread crust is probably the best of it's kind that I have tasted. I think toasting the almonds makes a big difference. The tart of the lemon with the sweet of the sugar and crust was amazing. It does take some extra time toasting the almonds, cooling the crust, etc. but each step was really simple and I could run off and do something around the house in between. I will for sure make these again as I am a big fan of lemon.

Toasted Almond Lemon Bars
From The Sweet Melissa Baking Book by Melissa Murphy
Makes 1 dozen bars

For the Crust:

2 cups all-purpose flour

3/4 cup confectioners' sugar

1/2 cup sliced blanched almonds, lightly toasted

1/2 teaspoon salt

20 Tablespoons (2 1/2 sticks) cold, unsalted butter, cut into 1/4-inch pieces

For the Lemon Filling:

4 large eggs

1 3/4 cups sugar

1/2 teaspoon almond extract

1/2 cup all-purpose flour

3/4 cup fresh lemon juice (about 7 lemons)

1/4 cup confectioners' sugar for sprinkling

*To Toast the Almonds:Preheat the oven to 350 degrees F. Spread the almonds in a single layer on a cookie sheet. Bake for 10 to 12 minutes, or until lightly golden and you can smell them. Remove to a wire rack to cool.*

Before You Start:Position a rack in the center of your oven. Preheat the oven to 350 degrees F. Spray a 9 x 13 - inch pan with nonstick vegetable cooking spray. Make a parchment "sling" by cutting two pieces of parchment paper, measuring 16 1/2 inches long by 12 inches wide (you can also use aluminum foil). Place one piece across the length, and the other across the width of the pan, with the excess hanging over the edges. You will use this sling later to lift the finished bar from the pan. Spray the sling with the cooking spray.
To Make the Crust:1. In the bowl of a food processor fitted with the metal blade, pulse the flour, sugar, almonds, and salt to combine. Add the cold butter in pieces and pulse until the dough comes together in a ball.
2. Turn the dough out into the prepared pan and press evenly into the bottom and 1 1/4 inches up the sides. (This crust, once it is baked, needs to act as a liner in which to pour the liquidy lemon filling. So be sure to do a good job of pressing the dough up the sides - no cracks!). Cover the dough with a piece of parchment paper or aluminum foil, and fill with pie weights ( you can use dried beans or uncooked rice as pie weights as well). Bake for 25 to 30 minutes, or until lightly golden. Carefully remove the pie weights and the liner and bake for an additional 10 to 15 minutes, or until the whole crust is golden. Remove to a wire rack to cool.
To Make the Filling:In a medium bowl, whisk together the eggs and sugar until smooth. Add the almond extract and flour, and whisk until smooth. Add the lemon juice, and whisk to combine.
To Complete the Bars:1. Pour the lemon filling into the prepared crust. Reduce the oven temperature to 325 degrees F. Bake for 30 minutes, or until the filling is firm and lightly golden. Remove to a wire rack to cool.
2. When cool use the parchment sling to lift the entire bar from the pan and onto a cutting board. Slice into twelve 3 x 3 1/2 - inch bars. Remove from the pan and, using a small sifter, dust with the confectioners' sugar.
The bars keep in an airtight container at room temperature for up to 2 days. For longer storage, wrap in plastic wrap and refrigerate for up to 5 days, or freeze well wrapped in plastic wrap and then aluminum foil for up to 3 weeks. Do not unwrap before defrosting. Dust with confectioners' sugar before serving.

Pin It!

Old Fashioned Butter Pecan Ice Cream


With the weather heating up, it was time to break out the ice cream maker again. My friend Curtis, from work, brought in home-made peach cobbler and I brought in the ice cream and we had a nice little party today at work! This ice cream was to die for!!

Ingredients:
1/2 cup butter
1-1/2 cups Chopped pecans
1-1/2 cups Dark brown sugar
1 cup Half-and-half
2 larege eggs; lightly beaten
4 cups Heavy cream
dash salt

Instructions
Melt 4 tablespoons butter in skillet and saute the pecans until lightly browned. Drain on paper towels. Place brown sugar, half-and-half, and remaining butter in a heavy saucepan. Heat over low heat stirring steadily, until the sugar dissolves and buter is melted. Let cool. Place eggs and butter mixture into a blender and blend on medium speed until mixture is smooth. Slowly add the cream and salt and continue blending on low speed until mixture is very smooth, about 30 seconds. Add pecans. Transffer mixture to your ice cream machine and freeze according to the manufacturers instructions. Makes about 2 quarts of Butter Pecan Ice Cream.
Pin It!

Tuesday, April 28, 2009

Skillet Lasagna


"What's the best way to make lasagna with rich meaty flavor, chunks of tomato, and gooey cheese, without ever turning on the oven or boiling a pot of water? In a skillet."

Ever since I purchased The Best Skillet Recipes the Skillet Lasagna on the cover has been calling out to me. I finally made it tonight and was not disappointed. In fact, it might just be one of my new favorite meals. It starts with a simple, homemade tomato sauce, add some meat, noodles, and of course the cheese. Three kinds in fact-- ricotta, mozerella, and parmesean. Also, it is different from regular lasagna because it's made entirely on the stove in a skillet. No heating up the oven in 100 + weather in the St. George heat! It had the perfect ratio of sauce, noodles, and cheese and I loved every bite! This will be a new staple for dinner at our house.


Skillet Lasagna

from The Best New Recipe


3 14.5 oz. cans whole peeled tomatoes

1 tablespoon olive oil

1 medium onion, minced

Salt

3 medium cloves, minced (about 1 tbsp.)

1/8 tsp red pepper flakes

1 pound meatloaf mix (this is a mix of ground beef, pork and veal. You can substitue 1/2 lb. ground pork and 1/2 lb. ground beef)

10 curly-edged lasagna noodles, broken into 2 inch pieces

2 oz. mozerella cheese, shredded (1/2 cup)

1/2 oz. parmesean cheese, grated (1/4 cup)

Ground black pepper

3/4 cup ricotta cheese (if you don't like ricotta you can always use cottage cheese)

3 tbsp. chopped fresh basil leaves


Pulse the tomatoes with their juice in a food processor until coarsely ground and no large pieces remain, about 12 pulses.

Heat oil in a 12 inch nonstick skillet over medium heat until shimmering. Add the onion and 1/2 tsp salt and cook, stirring often, until softened, 5 to 7 minutes. Stir in the garlic and red pepper flakes and cook until fragrant, about 30 seconds. Add the ground meat and cook, breaking apart the meat, until lightly browned and no longer pink, 3 to 5 minutes.

Scatter the pasta over the meat, then pour the processed tomatoes over the pasta. cover, increase the heat to medium high, and cook, stirring often and adjusting the heat to maintain a vigorous simmer, until the pasta is tender, about 20 minutes.

Off the heat, stir in half of the mozarella and half of the Parmesan. Season with salt and pepper to taste. Dot heaping tablespoons of the ricotta over the noodles, then sprinkle with the remaining mozzarella and Parmesan. cover and let stand off the heat until the cheese melts, 2 to 4 minutes. Sprinkle with basil and serve.


*I used a cookie scooper for the ricotta and it worked really well.*


Pin It!

Monday, April 27, 2009

Chewy Cinnamon Cookies


If you're a fan of Snickerdoodles you need to try these Chewy Cinnamon Cookies from Kitchen Addiction. This is actually a recipe she created herself for her sister who said she preferred no chocolate in her cookies (shocking!) .They look just like a big, huge cookie you would buy from a bakery and taste just as good. They are chewy ( because they use mostly brown sugar), thicker, softer and more cinnamony. They have cinnamon mixed into the dough as well as sprinkled generously on top. Plus they're about 3 times as big. You can eat just one and feel very proud of yourself (even if in actuality it's equivalent to 3 normal sized cookies). I refrigerated mine for 24 hours and then to shape them rolled them into balls and smashed them with a drinking glass.


Chewy Cinnamon Cookies


from Kitchen Addiction


2 c. + 2 T. (8 1/2 oz.) cake flour


1 3/4 c. + 2 T. (8 1/2 oz.) bread flour


1 1/4 t. baking soda


1 1/2 t. baking powder


1 t. Kosher salt


1 c. unsalted butter, room temperature


3/4 c. (5 1/2 oz.) granulated sugar


1 3/4 c. (12 1/2 oz.) light brown sugar


1 1/2 t. cinnamon


2 eggs


1 t. vanilla extract


granulated sugar


cinnamon


In a medium bowl, whisk together the flours, baking soda, baking powder, and salt. Set aside.In a stand mixer, cream the butter, granulated sugar, brown sugar, and cinnamon together on medium high for 5 minutes, until very light and fluffy. Mix in eggs, one at a time, and then vanilla. Stir in the dry ingredients until just combined.Cover at surface with plastic wrap and refrigerate at the very least 4 hours, but preferably 24 hours before baking.To make the cinnamon-sugar topping, combine 1 t. cinnamon for every 1/4 c. sugar.To bake, preheat the oven to 350˚. Place a silpat or parchment paper on a large baking sheet. Place 8 2-oz. rounds (2 1/2 - 3 T.) on a baking sheet. Sprinkle each ball heavily with cinnamon-sugar mixture. Bake 18-19 minutes, until golden brown but still slightly moist on inside. Cool 5-10 minutes on sheet, them cool completely on a wire rack.The unbaked dough will keep in the refrigerator up to 72 hours (if you keep it well hidden).

*Cookies will look slightly raw in center. This is okay. They will set up after they have cooled. If you leave them in longer they'll get too hard and lose their chewy texture*


Pin It!

Sunday, April 26, 2009

Key Lime Pie


My second favorite thing at Cafe Rio besides the chicken salad is the Key Lime Pie. However, I always seem to eat too much and not have room for dessert so I decided to make it at home today. This is by far my favorite recipe. It was so tart and creamy thanks to 3 whole cans of sweetened condensed milk, I really don't know how it could have turned out bad. I do have to tell you though, unless you are planning on torturing yourself, please use regular limes (I wouldn't recommend the bottled stuff). It took me about an hour to hand squeeze 4 lbs. of the tiny key limes !I don't think I'll be doing that again. I chose to make it into 2 pies and actually made it in two 9 in cake pans but you can also use a 9 x13 pan or a 10 x 2 in deep pie pan. If you want it green just squeeze in a few drops of green food coloring.
Key Lime Pie
WorldWide Ward Cookbook
3/4 lb. graham crackers (this works out to be 22 1/2 graham crackers)
1/2 c. packed brown sugar
1/4 c. plus 1 tbsp. butter, melted
3 14 oz. cans sweetened condensed milk
5 egg yolks
2 cups Key Lime Juice (or regular lime juice) FRESH ONLY
green food coloring if desired
Sweetened Whipped Cream
Lime slices and if desired mint for garnish
In a bowl, combine graham cracker crumbs, brown sugar, and melted butter. Press mixture 1/2 inch thick on bottom and sides of 10 x 2 in deep fluted pie pan (or 9 x13 or 2 regular sized pie pans). In another bowl, mix condensed milk, egg yolks and lime juice (add food coloring if desired at this point) on low speed of mixer until well blended, about 2 minutes (it should be creamy in color and slightly thickened). Pour into prepared pie shell and bake at 350 degrees for 18-24 minutes (when pie is done, pressing the surface lightly with a finger should leave a mark). Remove from oven and let cool. Refrigerate 6-8 hours before serving. Garnish with sweetened whipped cream, fresh limes, and mint sprigs.
Pin It!

Saturday, April 25, 2009

Chicken Spaghetti Casserole


Okay, before you see the word casserole and just write this off, I am going to tell you it's good. This was one of my favorite meals growing up and I still think it is a great comfort food. It's spaghetti in a creamy white sauce with green peppers. Now that's not so scary is it? The recipe originally called for a large chicken but I just use boneless, skinless chicken breast. You could also use a rotisserie chicken to speed things up. It can be made a day ahead and refrigerated until you are ready to cook it. Just make sure to increase the cooking time a little bit. Sometimes to change things up a bit I use diced green chilies in place of the green peppers.


Chicken Spaghetti Casserole


1- 1 1/2 tbsp olive oil


2 or 3 boneless, skinless chicken breasts


10 tbsp. butter, divided


1 c. chopped celery (I leave this out because my husband doesn't like it )


2 cans of cream of chicken soup


2 1/2 cups milk (I usually use 2 percent for this, not skim)


12 oz. spaghetti noodles, broken into 2 in pieces


1/2 c. chopped onion


1/2 c. chopped green pepper


5 tbsp. flour

1 tsp. salt


1/2 tsp. pepper


1 cup cheddar cheese for top of casserole (optional)


salt, pepper, and garlic powder to taste (for seasoning chicken)


Preheat oven to 325 degrees.


Season chicken with salt, pepper and garlic powder to taste. Cook chicken breasts in 1-1 1/2 tbsp. olive oil until browned and cooked through. Let cool and shred or cut into bite sized pieces. Set aside.


Meanwhile, break spaghetti into 2 inch pieces and cook according to package directions.


Saute onion, celery and green pepper in 5 tbsp. butter until soft. Add 2 cans of Cream of Chicken soup.


In a separate pan make a white sauce. Melt remaining 5 tbsp. butter. Whisk in flour and milk until smooth. Add salt and pepper. Cook about 7-10 minutes until slightly thickened. Add to vegetable mixture. Add chicken and spaghetti. Mix well to combine. Pour into a greased 9 x 13 pan and bake 25-30 minutes at 350 degrees until bubbly.


*Pioneer Woman has a similar recipe on her website (I'll have to try it). She uses cream of mushroom soup so I'm sure you could use that in place of the cream of chicken with good results.*


Pin It!

Friday, April 24, 2009

Chocolate Lava Cakes


This is one of my favorite desserts from my friend Andrea. She has a lot of great recipes and this is one of them. It is almost like a brownie on top but then has a warm gooey, hot fudge, not all the way done in the middle center. They are delicious with a little powdered sugar, whipped cream or if you really want to indulge, vanilla ice cream. This is a great dish for company because you can put it in the oven when they arrive for dinner and by the time you're done eating, they're cooked and cooled and ready to go. It's also nice for Valentine's or a romantic dinner.


Chocolate Lava Cakes


6 oz. semi sweet chocolate chips


1 1/2 sticks butter


3 large eggs


4 egg yolks


1 1/2 cups powdered sugar


1/2 c. flour


butter for ramekins


sugar for ramekins (optional)


Butter 6 ramekins and if desired sprinkle with sugar. In a medium saucepan melt butter and chocolate chips. Mix all other ingredients together and then add melted chocolate/butter mixture. Pour into buttered ramekins. Bake at 425 for 10-12 minutes. Let cool for 10-15 minutes before serving. Garnish with powdered sugar, whipped cream or vanilla ice cream. Serves 6.


**This is one of those trial and error desserts. Let the edges get pretty done looking. If they come out too runny just stick them back in for 5-10 more minutes**

Pin It!

Penne with Sausage & Spinach

Another winning recipe in my book from Cook's Illustrated. This meal was really flavorful thanks to Italian Sausage, garlic and sun dried tomatoes. It was made even more delicious with the addition of toasted pine nuts, baby spinach, and parmesean cheese . The chicken broth combined with the juices from the sausage, tomatoes and garlic made a delicious sauce that you didn't even really notice was there, it just created a flavorful coating for the pasta . I loved, loved, loved that this meal was made all in one pan, pasta and all. Plus, besides the garlic there were no spices to measure so it came together really quickly. Serve some breadsticks on the side and you have a great weeknight dinner. Just to note, I felt that by the time you added the last of the spinach, the first spinach had wilted a little too much for my taste so next time I will add it all at once.


Penne with Sausage and Spinach

1 tablespoon olive oil
1 pound hot or sweet Italian turkey sausage , casings removed (I used mild)
3 cloves minced garlic
2 1/4 cups low-sodium chicken broth (I just used regular because that's what I had)
2 1/4 cups water
8 ounces penne pasta (2 1/2 cups)
1/2 cup oil-packed sun-dried tomatoes, rinsed and chopped fine
Table salt and ground black pepper
1 (6-ounce) bag baby spinach
1/2 cup grated Parmesan cheese
1/4 cup pine nuts , toasted
Instructions
1. Brown Sausage: Heat oil in 12-inch nonstick skillet over medium-high heat until just smoking. Add sausage, breaking it up with a spoon, and cook until lightly browned, about 3 to 5 minutes. Stir in garlic and cook until fragrant, about 30 seconds.
2. Simmer Penne: Stir in broth, water, penne, tomatoes, and 1/2 teaspoon salt. Increase heat to high and cook, stirring often, until penne is tender and liquid has thickened, 15 to 18 minutes.
3. Wilt Spinach: Stir in spinach, handful at time, and cook until wilted. Off heat, stir in Parmesan and nuts. Season with salt and pepper to taste. Serve.

*If I am short on time I just toast the pine nuts on the stove. Put them in a pan and stir over medium heat until fragrant. Just watch them really carefully because they burn easily.*


Pin It!

Thursday, April 23, 2009

Cowboy Cookies


While I might not have a real cowboy like Pioneer Woman (mine is more of the bike riding variety) he can still enjoy these Cowboy Cookies. These cookies are soft, chewy, oatmealy, & chocolately. They also turned out nice and puffy. Some oatmeal cookies (even though they taste amazing) look a little flat. They're perfect to take along hiking or in my husband's case on the biking trail because the oatmeal gives you that extra uumph! I used chocolate chunks and next time will probably add twice as many as I love chocolate and wished there was more of it in these. I also chose to omit the nuts as I am sending them with my hubby to Moab and know that some people don't care for nuts.


Cowboy Cookies

adapted from the WorldWide Ward Cookbook


1 cup shortening (I like to use butter flavored Crisco)

1 cup packed brown sugar

1 cup sugar

1 tsp. vanilla

2 eggs

2 cups flour

1 tsp. baking soda

1/2 tsp. baking powder

1/2 tsp. salt

2 cups oats (I used old fashioned)

1 cup nuts, chopped (optional)

1 or 2 cups chocolate chips or chunks ( If you are adding nuts, keep the chocolate chips to 1 cup. If not, you can add 1-2 cups depending on how chocolatey you want them)


Cream the shortening, brown sugar, and sugar until smooth. Add eggs and vanilla. Mix well. Sift flour, baking soda, baking powder, and salt together. Mix into batter. Stir in oats, nuts, and chocolate chips (I did this by hand so I didn't over mix them). Spoon onto cookie sheet, placing about 2 inches apart. Bake at 350 for 10-12 minutes. Makes 3-4 dozen.

Pin It!

Wednesday, April 22, 2009

Thick and Chewy Triple-Chocolate Cookies

When you have an uncontrollable urge for chocolate look no further. A moist chocolate base with slightly melted chocolate oozing into every bite, these are a chocolate lover's dream. They are like a molten chocolate cake in cookie form . Make sure and have a tall glass of milk handy.


Thick and Chewy Triple- Chocolate Chewy Cookies

adapted from The Best Recipe

2 cups unbleached all-purpose flour
½ cup Dutch-processed cocoa or unsweetened baking cocoa
½ tsp. salt
16 oz. semisweet chocolate, chopped
4 large eggs
2 tsp. vanilla extract
10 tablespoons (1 ¼ sticks) butter, softened but still cool
1 ½ cups packed light brown sugar
½ cup granulated sugar
12 oz. (about 2 cups) semi sweet chocolate chips (optional)

Sift together flour, cocoa, baking powder and salt in a medium bowl; set aside.

Melt the chocolate in a medium heatproof bowl set over a pan of almost-simmering water, stirring once or twice until smooth; remove from heat. In a small bowl beat the eggs and vanilla lightly with a fork.

Either by hand or with an electric mixer, beat the butter at medium speed until smooth and creamy, about 5 seconds. Beat in sugars until combined, about 45 seconds; the mixture will look granular. Reduce the speed to low and gradually beat in the egg mixture until incorporated, about 45 seconds. Add the chocolate in a steady stream and beat until combined, about 40 seconds. Scrape the bottom and sides of the bowl with a rubber spatula. With the mixer at low speed, add the dry ingredients and mix until just combined. If desired, add chocolate chips. Do not overbeat. Cover with plastic wrap and let stand at room temperature until the consistency is scoopable and fudge-like, about 30 minutes.

Meanwhile, adjust the oven racks to the upper and lower middle positions and heat the oven to 350 degrees. Line 2 baking sheets with parchment paper. Scoop the dough onto the prepared baking sheets with a 1 3/4 in ice cream scoop, spacing mounds of dough about 1 ½ inches apart.
Bake until the edges of the cookies have just begun to set but the centers are still very soft, about 10 minutes, rotating the baking sheets from front to back and top to bottom halfway through the baking time. Cool the cookies on the sheets about 10 minutes, slide the parchment with the cookies onto wire racks and cool to room temperature. Repeat with remaining dough. Remove cooled cookies from the parchment with a wide metal spatula.

Pin It!

Banana Crumb Mufins


You would think I would clue in after awhile that my family is sick of bananas. I had a whole counter full last night and was sick of staring at ugly black bananas hence all the banana recipes today. I have made these previously and really like them. They are just like banana bread in muffin form with a delicious brown sugar crumb topping. I took the advice of other reviewers and added some vanilla, nutmeg and cinnamon to give them a little pick me up.
Banana Crumb Muffins
adapted from allrecipes.com

1 1/2 cups all-purpose flour
1 teaspoon baking soda
1 teaspoon baking powder
1/2 teaspoon salt
3 bananas, mashed
3/4 cup white sugar
1 egg, lightly beaten
1/3 cup butter, melted
1 tsp. vanilla extract
1/4 tsp. nutmeg
1/2 tsp. cinnamon
1/3 cup packed brown sugar
Crumb Topping
2 tablespoons all-purpose flour
1/4 teaspoon ground cinnamon
1 tablespoon butter
DIRECTIONS
Preheat oven to 375 degrees F (190 degrees C). Lightly grease 10 muffin cups, or line with muffin papers.
In a large bowl, mix together 1 1/2 cups flour, baking soda, baking powder,salt nutmeg and cinnamon. In another bowl, beat together bananas, sugar, egg, melted butter & vanilla. Stir the banana mixture into the flour mixture just until moistened. Spoon batter into prepared muffin cups.
In a small bowl, mix together brown sugar, 2 tablespoons flour and cinnamon. Cut in 1 tablespoon butter until mixture resembles coarse cornmeal. Sprinkle topping over muffins.
Bake in preheated oven for 18 to 20 minutes, until a toothpick inserted into center of a muffin comes out clean.
Pin It!

Tuesday, April 21, 2009

Tuscan Garlic Chicken Pasta


We were supposed to go out tonight but plans were changed and I had to scrounge something for dinner. I had remembered seeing this recipe on My Kitchen Cafe and fortunately I had most of the ingredients on hand. It was a nice light pasta dish with delicious garlic and lemon flavors and a hint of red pepper. I chose not to add the reserved pasta water because my husband doesn't care for cooked or "slimy" spinach and thought it tasted really nice and fresh that way. It is pretty healthy because it uses olive oil and it's another meal in one with your meat, pasta and veggies all in one. This is a great dinner for Spring and something you can eat for lunch and not feel guilty about.
Tuscan Garlic Chicken Pasta
adapted from Cook's Country and My Kitchen Cafe
6 garlic cloves, minced
1/4 teaspoon red pepper flakes (this doesn't add spiciness - just the right amount of flavor)
6 tablespoons olive oil
4 boneless, skinless chicken breasts (about 1 1/2 pounds)
Salt and pepper to taste
1 pound penne pasta1
(5-ounce) bag baby spinach
1/2 cup chopped fresh basil or 1 tablespoon dried
6 tablespoons juice from 2 lemons
1 cup grated parmesan cheese
Bring 4 quarts water to a boil in a large pot. Meanwhile, combine garlic, pepper flakes and oil in a small microwave-safe bowl and microwave until garlic is golden and fragrant, about 1 minute.Pat chicken dry with paper towels and cut into bite-size pieces. Season with salt and pepper. Transfer 1 tablespoon of the garlic/red pepper oil to a large skillet and heat over medium heat until oil is rippling. Add chicken and cook until well browned and cooked through. Transfer to a plate and tent with foil.Add 1 tablespoon salt and the pasta to boiling water and cook until tender but still slightly firm (al dente). Reserve 1/2 cup cooking water. Drain pasta and return to the pot. Stir in chicken, spinach, basil, lemon juice, Parmesan, and remaining garlic mixture, adding reserved pasta water as needed (I skipped this part). Season with salt and pepper. Serve immediately.
Pin It!

Sunday, April 19, 2009

Sunday Brunch

We had some friends in town this weekend for UNLVino, and decided to have everyone over for brunch today before they all went home. The food was delicious and I wasn't stuck in the kitchen the whole time because I was able to make some of the things ahead and time and just throw it in the oven before the guests arrived. Here's what we had on the menu:

Caramel Pecan French Toast
Spring Onion & Smoked Salmon Frittata
Breakfast Potatoes
Breakfast Sausage
Fresh Fruit & Assorted Cheese Platter
Shrimp Cocktail
Lemon Tarts topped with Assorted Fruits
Paula Dean's Southern Pecan Brownies
Croissants with Strawberry Jam and Lemon Curd
Coffee
Orange Juice
Cranberry Juice

The caramel pecan french toast and the brownies are from recipes that Sallie posted on here and the lemon tart is from a previous recipe that I posted. The french toast was so good. I made two pans of it and there was hardly any leftover. The brownies were so delicious as well, I will definitely be using that recipe for my "go to" brownie recipe in the future. Here are recipes for the other menu items:

Breakfast Potatoes
These potatoes were a huge hit. They've got a little bit of a kick to them, but you can add less chili flakes if you don't like spicy food. They're also good with ketchup.

Ingredients:
2 large russet potatoes diced
2 -3 TBS olive oil
1 tsp dried dill or parsley
1 tsp paprika
1 tsp pepper
2 TBS grated Parmesan cheese
2 tsp salt
1 tsp chile flakes

Instructions:
Preheat oven to 425 deg.
Peel and wash potatoes. Dice potatoes in small cubes (about 1/2 inch thick).
Place in a medium bowl. Add olive oil and toss to coat all potatoes. Add the rest of the ingredients and toss to mix.
Place potatoes in a single layer in a 13x9 pan.
Bake for 40 -45 minutes or until nicely golden brown.

Spring Onion and Smoked Salmon Frittata
This frittata was so good. The chunks of cream cheese and the flavor of the smoked salmon pair so well together. I got this recipe from Williams Sonoma, but altered it a bit so I could bake it rather than have to tend to it on the stove.

Ingredients:
1 1/2 Tbs. unsalted butter, melted
1 green onion, thinly sliced
6 eggs
3 Tbs. heavy cream
2 1/2 oz. smoked salmon, cut into 1-inch pieces
2 oz. cream cheese, cut into 1/2-inch cubes
2 Tbs. minced fresh chives
Salt and freshly ground pepper, to taste

Directions:
Prehead the oven to 350 degrees. Pour melted butter into a baking dish. In a bowl, whisk together the eggs and cream. Stir in the smoked salmon, cream cheese, 1 Tbs. of the chives and the green onion, and season with salt and pepper. Pour into baking dish. Bake for 35-45 minutes or until the eggs are set and a toothpick comes out clean. Garnish with the remaining 1 Tbs. chives. Serves 4 to 6.

Lemon Curd
The lemon curd is used to make lemon tarts, but it also it very yummy used as a spread on croissants. I also got this recipe from the Williams Sonoma website, but altered it slighty. I like to strain the curd once it's finished because I don't like the lemon zest in the curd, I think it is better when it has a completely smooth texture.

Ingredients:
5 egg yolks
1/2 cup sugar
1/4 cup fresh lemon juice
Grated zest of 2 lemons
6 Tbs. (3/4 stick) unsalted butter

Directions:
In a heavy saucepan, combine the egg yolks and sugar and whisk vigorously for 1 minute. Add the lemon juice and zest and whisk for 1 minute more. Set the pan over low heat and cook gently, stirring constantly, until slightly thickened, 10 to 15 minutes. Remove the pan from the heat. Strain though a fine mesh sieve. Stir in the butter. Let cool, stirring occasionally. Cover tightly and refrigerate before using. Makes about 1 cup.
Pin It!

Menu Idea - Dressed up Weekend BBQ


Sometimes the hardest part of dinner is deciding what to serve together. This is a menu for a Dressed up Weekend BBQ. Start off with some juicy,cheesy burgers. Add a fresh orzo salad, fruit, chips and a tall glass of lemonade (with fresh lemons and limes) to wash it all down. Finish the meal with some fabulous Brownie Ice Cream Sandwiches that are sure to be a favorite with adults and children.

Jack Cheese Burgers with Tomato-Avocado Salsa on Ciabatta Rolls
Tri Color Orzo
Fresh Fruit Tray
Chips
Brownie Ice Cream Sandwiches
Soda or Lemonade or Water garnished with lemons and limes


Pin It!

Tri-Colore Orzo


To go along with my "fancy" Jack Cheese Burgers I wanted something lighter than potato salad. This was perfect. I loved the combination of the slightly chewy orzo pasta with the freshness of the baby spinach and tartness from the cranberries. Add some feta cheese and toasted pine nuts and yum. The olive oil dressing is great because it doesn't cover up the flavors of all the other ingredients. To my surprise my husband declared this one of his new favorite salads. Go figure.
Tri- Colore Orzo
adapted from Giada De Laurentiis

1 pound orzo pasta
3 tablespoons extra-virgin olive oil, plus 1/4 cup
2 cups baby spinach (about 3 ounces)
3/4 cup crumbled ricotta salata cheese (or feta cheese)
1/2 cup dried cranberries
12 fresh basil leaves, torn
1/4 cup toasted pine nuts
3 tablespoons lemon juice
1 1/2 teaspoon salt
1 teaspoon freshly ground black pepper
Directions
Bring a large pot of salted water to a boil over high heat. Add the pasta and cook until tender but still firm to the bite, stirring occasionally, about 8 to 10 minutes. Drain pasta and put the pasta on a large cookie sheet. Drizzle the pasta with 3 tablespoons olive oil, toss, spread out, and set aside to cool.
Once the orzo is cool, transfer to a large serving bowl. Add the remaining ingredients and toss gently to combine. Serve
Pin It!

Jack Cheese Burgers with Tomato Avocado Salsa on Ciabatta Rolls


Don't let the fancy name scare you. These are just yummy cheese burgers topped with some guacamole salsa. I wanted to do something easy but nicer than just plain old burgers. I spotted this recipe in a book I checked out from the library. These burgers were really good. A hamburger pattie with grated cheese throughout and topped with a tomato avacado salsa. I took the seeds out of the jalepeno and the salsa was very mild. Next time I will leave some in because I like things spicy. I served them on Ciabatta Rolls instead of hamburger buns. I was going to put bacon on them too, but in my rush forgot. The only other thing I would change is to add some garlic powder to the hamburger patties next time.
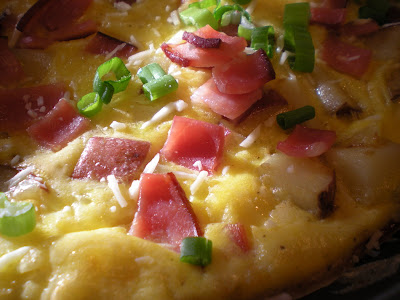
Jack Cheese Burgers with Tomato-Avocado Salsa
from the Perfect Recipe
Burgers:
1 1/4 lbs. 100 % ground chuck
3/4 tsp. salt
1/4 tsp. ground black pepper
3/4 c. grated Monterey Jack Cheese
Tomato-Avocado Salsa
1 small avocado, peeled and pitted
1 small ripe tomato, cut into very small dice
1 tbsp. minced scallion
1 tsp. finely minced jalepeno pepper (if you don't like it too spicy remove seeds)
1 1/2 tsp. minced cilantro leaves
1 tbsp. fresh lime juice
Salt & freshly ground black pepper to taste
Hamburger Buns or Ciabatta Rolls
Directions for hamburgers:
Place ground chuck in large bowl and break up with fingers to increase surface area for seasoning. Sprinkle salt and pepper over meat and toss lightly with hands to distribute seasoning. Divide meat into 4 equal portions (5 oz. each). With cupped hands, toss portion of meat back and forth to form a loose ball. Pat lightly to flatten to a 1 in. thick burger, 3 1/2-4 inches across, using your fingertips to create a pocketed, textured surface. Repeat with remaining meat. Makes 4 patties.
Directions for Tomato-Avocado Salsa:
Mash avocado with a fork until chuncky. Add tomato, scallion, jalepeno, cilantro, lime juice and salt and pepper to taste. Top each hamburger with a portion Add any other garnishes you would like and serve.
Pin It!

Ice Cream Brownie Sandwiches


My Little Helper! I think she liked them too!
The weather has been so gorgeous this weekend we decided to break out the bbq and have our lunch outside today. I wanted to do something different for dessert and found this recipe in my file. I have to admit I've had it there for about a year. Everytime I look at it I see that it takes more than one day to make it I keep on flipping the pages. Let me tell you. It is totally worth it! A fudgy brownie bottom, ice cream in the middle and a delicious hard shell chocolate on top. Think Klondike bar with a brownie bottom! Your guests will be impressed. After making them I discovered it's not quite at hard as it sounds. First of all you can divide it into 3 tasks. The first making the brownie (let it sit overnight), the second putting the ice cream on the brownie (freeze it overnight) and last topping it with chocolate. The first two steps are actually really easy and don't take much time. The chocolate covering takes a little longer. They were so yummy. I did half of them with vanilla and half with cookie dough ice cream. Also, I think that if you're going to spend this much time on a dessert you need to get good quality ice cream. It makes a big difference.


Ice Cream Brownie Sandwiches

Makes 12
14 tablespoons (1 3/4 sticks) unsalted butter
46 ounces semisweet chocolate, cut into 1-inch pieces
3 large eggs
1/2 teaspoon salt
1 cup granulated sugar
1/2 cup packed light-brown sugar
1 teaspoon pure vanilla extract
3/4 cup all-purpose flour
4 pints Ice Cream (I used 2 Dryers 1.5 qts)
Directions
Preheat oven to 350 degrees. Line a 10-by-13-inch pan with parchment paper. Bring a small saucepan of water to a boil, and turn off heat. Combine 12 tablespoons butter and 6 ounces chocolate in a small heatproof bowl; set over saucepan. Let stand, stirring occasionally, until chocolate is melted and smooth.
Whisk eggs together in a large bowl; add salt, granulated sugar, brown sugar, and vanilla, and stir to combine. Stir in butter-and-chocolate mixture, then fold in flour. Pour the batter into prepared pan, spread evenly, and place in oven to bake until top is shiny, about 20 minutes. Do not overbake: A cake tester should not come out clean.
Set the brownie pan on a rack; let it cool completely. Store in an airtight container overnight. The next day, loosen corners of brownie. Lift it from pan, keeping brownie intact. Invert onto a cutting board, and peel off parchment. Trim about 1/4 inch from each edge.
Place a fresh piece of parchment in baking pan, allowing excess to stick out over the edges of pan. Return brownie to pan, top side up, and set aside.
Meanwhile, working quickly, scoop half of the ice cream into the bowl of an electric mixer fitted with the paddle attachment. Beat ice cream until soft and smooth but not melted. Using a rubber spatula, transfer ice cream to brownie pan, and spread, creating an even layer. Place the pan in the freezer to chill. Repeat with remaining 2 pints of ice cream, adding a second layer to brownie, and return pan to freezer. Let chill until very hard, at least 1 hour (chilling overnight produces the best result).
When ready to assemble, fill a medium saucepan halfway with water; bring to a boil. Remove from heat. Place remaining chocolate and 2 tablespoons butter in metal bowl; set over water. Using a metal spoon, stir until melted and smooth.
Remove pan from freezer. Place a cooling rack over a baking sheet, and set aside. Using edges of parchment paper, lift brownie and ice cream out of pan, and transfer to a cutting board. Working quickly and using a sharp hot knife, trim outside edges to even them, wasting as little of the ice cream and brownie as possible. Use hot knife to cut brownie into twelve 2 1/4-by-4 1/4-inch rectangles, and transfer each rectangle to cooling rack.
Remove bowl of chocolate from saucepan, wiping bottom until dry. Fill a 1/2-cup ladle with melted chocolate; carefully ladle chocolate over each bar, working from front to back. Cover as much of the ice cream as you can. Work quickly; do not worry if some ice cream shows. Return rack and baking sheet to freezer. Let stand until chocolate hardens, about 30 minutes. Serve, or store in an airtight container in freezer for up to 1 week.
Pin It!

Friday, April 17, 2009

Apple Spice Cake

I know this is more of a fall recipe but it is one of my favorites. It is from the Martha Stewart website. Besides looking delicious, I wanted to try it because it is one of the most popular recipes on their website. It lived up to its reputation. It is like apple pie flavor in a cake. I love the cinnamon flavor and caramel sauce and don't forget to serve it with ice cream.

1 1/3 cups vegetable oil
3 cups all-purpose flour
1 tablespoon ground cinnamon
1 teaspoon baking soda
1 teaspoon salt
2 cups sugar
3 large eggs
3 to 4 Granny Smith apples, cored and cut into 1/2-inch pieces (3 cups)
1 cup chopped assorted nuts, such as pecans and walnuts (optional)
1 teaspoon pure vanilla extract
Non stick cooking spray with flour (or grease and flour pan)

Caramel Sauce
Makes enough for 1 cake

1 cup light-brown sugar
1/2 cup (1 stick) unsalted butter
1/4 cup evaporated milk
1 teaspoon pure vanilla extract
Pinch of salt

Directions
Combine ingredients in a small saucepan over medium heat. Cook, stirring, until thickened to desired consistency


Directions for Cake:
Preheat oven to 350 degrees. Spray a 12-cup Bundt pan with cooking spray; set aside.
Working over a large sheet of parchment paper, sift together flour, cinnamon, baking soda, and salt; gather sifted ingredients into center of sheet; set aside.
In the bowl of an electric mixer fitted with the paddle attachment, combine vegetable oil, sugar, and eggs; mix on high speed until lemon yellow.
Fold reserved parchment in half lengthwise; with mixer on medium speed, gradually shake in dry ingredients until just incorporated.
Add apples and, if desired, nuts, to batter; mix to combine. Add vanilla, mixing until incorporated.
Pour batter into prepared pan, and bake until a cake tester inserted in the center comes out clean, 75 to 90 minutes.
Remove from oven, and cool slightly on a wire rack.
Invert cake onto rack; turn cake right-side up to cool completely on rack, and serve drizzled with caramel sauce


Pin It!

Lemon Bread


Here is another one of my favorite bread recipes from Williams Sonoma. This bread carries a double dose of lemon: grated zest in the batter and lemon syrup poured over the bread after baking. It is a nice change from banana bread. They also suggest you can make it in mini loaf pans and top with berries and whipped cream and serve it as a dessert.
Ingredients:
1 1/4 cups all-purpose flour
1 tsp. baking powder
1/2 tsp. salt
8 Tbs. (1 stick) unsalted butter, at room temperature
1 cup sugar
2 eggs
1/2 cup milk
1 Tbs. finely grated lemon zest
1/2 cup chopped pecans
For the lemon syrup:
1/4 cup sugar
3 Tbs. fresh lemon juice
Directions:
Preheat an oven to 350ºF. Grease and flour a 1-lb. loaf pan. In a bowl, stir and toss together the flour, baking powder and salt. Set aside. In the bowl of an electric mixer fitted with the flat beater, beat the butter and sugar on medium speed until blended, 2 to 3 minutes. Add the eggs one at a time, beating well after each addition.Reduce the speed to low and add the flour mixture along with the milk and lemon zest. Beat until blended and smooth, stopping the mixer occasionally to scrape down the sides of the bowl. Stir in the pecans. Spoon the batter into the prepared pan and bake until a toothpick inserted into the center of the loaf comes out clean, 50 to 60 minutes. Meanwhile, make the lemon syrup: In a small bowl, combine the sugar and lemon juice. Set aside, stirring occasionally; don’t worry if the sugar does not dissolve completely. Remove the bread from the oven and transfer the pan to a wire rack. Using a fork, gently poke the top in several places. Stir the syrup, then slowly drizzle it over the hot bread. Let the bread cool in the pan for 15 minutes, then turn the loaf out onto the rack, top side up, and let cool completely. Makes 1 loaf.
Pin It!

Zesty Orange Bread

If you're sick of banana bread give this orange bread a try. Julia told me about this recipe from Williams Sonoma. It is the texture of a banana bread but with the flavor of orange . Because there is the zest of 3 oranges it really has a lot of orange flavor. This is a great bread to make into mini loaves for gifts. They also have a yummy lemon bread that I've made and will post. They're both really good.


Ingredients:
Zest of 3 oranges
1/2 cup sugar
2 Tbs. water
5 Tbs. unsalted butter
2 cups all-purpose flour
1 1/4 tsp. baking powder
1 tsp. baking soda
1/2 tsp. salt
2 eggs
3/4 cup plain yogurt
3/4 cup milk
For the orange syrup:
3 Tbs. sugar
3 Tbs. fresh orange juice

Directions:
Preheat an oven to 350ºF. Grease and flour a 1-lb. loaf pan. In a small saucepan over medium heat, combine the orange zest, 1/4 cup of the sugar and the water, stirring until the sugar dissolves, about 2 minutes. Add the butter and stir until melted, about 1 minute. Set aside. In a bowl, stir and toss together the flour, baking powder, baking soda, salt and the remaining 1/4 cup sugar. Set aside. In a large bowl, whisk together the eggs, yogurt, milk and reserved orange mixture until smooth. Add the flour mixture and stir until just blended. Spoon the batter into the prepared pan and bake until a toothpick inserted into the center of the loaf comes out clean, 50 to 60 minutes. Meanwhile, make the orange syrup: In a small bowl, combine the sugar and orange juice. Set aside, stirring occasionally; do not worry if the sugar does not dissolve completely. Remove the bread from the oven and transfer the pan to a wire rack. Using a fork, gently poke the top in several places. Stir the syrup, then slowly drizzle it over the hot bread. Let the bread cool in the pan for 15 minutes, then turn the loaf out onto the rack and let cool completely. Makes 1 loaf.


Pin It!

Thursday, April 16, 2009

Chocolate Chip Cookies


I recently started subscribing to a magazine called Cook's Illustrated. It doesn't look that pretty but they have lots of excellent recipes. This month they did a feature on the Perfect Chocolate Chip Cookie. When it comes to cookies I've found that everyone has a different opinion of what is perfect. Mine would include soft, chewy, buttery, chocolaty. This cookie definitely qualified. I couldn't resist having one right out of the oven and it was delicious. Soft, with gooey chocolate and a rich buttery taste. Although I can't pledge my devotion to just one chocolate chip cookie, I will for sure make this recipe again. *These cookies take a little longer than traditional cookies because of the butter browning and stirring/resting*

Chocolate Chip Cookies from Cook's Illustrated

Ingredients
1 3/4 cups unbleached all-purpose flour (8 3/4 ounces)
1/2 teaspoon baking soda
14 tablespoons unsalted butter (1 3/4 sticks)
1/2 cup granulated sugar (3 1/2 ounces)
3/4 cups packed dark brown sugar (5 1/4 ounces) (see note)
1 teaspoon table salt
2 teaspoons vanilla extract
1 large egg
1 large egg yolk
1 1/4 cups semisweet chocolate chips or chunks
3/4 cup chopped pecan or walnuts, toasted (optional)

Instructions
1. Adjust oven rack to middle position and heat oven to 375 degrees. Line 2 large (18- by 12-inch) baking sheets with parchment paper. Whisk flour and baking soda together in medium bowl; set aside.
2. Heat 10 tablespoons butter in 10-inch skillet over medium-high heat until melted, about 2 minutes. Continue cooking, swirling pan constantly until butter is dark golden brown and has nutty aroma, 1 to 3 minutes. Remove skillet from heat and, using heatproof spatula, transfer browned butter to large heatproof bowl. Stir remaining 4 tablespoons butter into hot butter until completely melted.
3. Add both sugars, salt, and vanilla to bowl with butter and whisk until fully incorporated. Add egg and yolk and whisk until mixture is smooth with no sugar lumps remaining, about 30 seconds. Let mixture stand 3 minutes, then whisk for 30 seconds. Repeat process of resting and whisking 2 more times until mixture is thick, smooth, and shiny. Using rubber spatula or wooden spoon, stir in flour mixture until just combined, about 1 minute. Stir in chocolate chips and nuts (if using), giving dough final stir to ensure no flour pockets remain.
4. Divide dough into 16 portions, each about 3 tablespoons (or use #24 cookie scoop). Arrange 2 inches apart on prepared baking sheets, 8 dough balls per sheet. (Smaller baking sheets can be used, but will require 3 batches.)
5. Bake cookies 1 tray at a time until cookies are golden brown and still puffy, and edges have begun to set but centers are still soft, 10 to 14 minutes, rotating baking sheet halfway through baking. Transfer baking sheet to wire rack; cool cookies completely before serving.

Pin It!

Sesame Chicken With Asparagus


I love asparagus. Back when my Husband's grandpa was alive we would have dinner at their house quite frequently. He had a garden and grew the best asparagus. In the summer we would have dinners that were mostly vegetables from their garden and they were so delicious. I miss those days. I love spring and summer because everything tastes fresher and it's a little easier to incorporate healthy dishes into the menu. This meal is nice because it has your meat, vegetable and pasta all in one. It is a tasty Asian dish flavored with a spicy peanut sauce and a great crunch from the asparagus. Perfect and light for spring.
Sesame Noodles with Chicken and Asparagus
from Cook's Country
2 boneless, skinless chicken breasts (about 12 oz.)
1 tablespoon vegetable oil
1 pound linguine (or fettuccine or spaghetti)
1 pound asparagus, trimmed and cut into 1 in. pieces
1/3 c. peanut butter
5 tablespoons rice vinegar
1/4 c. oyster sauce
2 tsp. chili-garlic sauce (this is a reddish looking sauce, almost like a fine salsa )
1 1/2 tsp. fresh grated ginger
1 1/2 tsp. toasted sesame oil
Bring 4 quarts of water to a boil in a large pot. Pat chicken dry with paper towels. Heat oil in large skillet over medium-high heat until just smoking. Cook chicken until no longer pink, 1 to 2 minutes per side. Transfer to plate.
Add pasta to boiling water and cook until just beginning to soften, about 8 minutes (check your pasta directions. Mine said al dente in 8 minutes so I cut this cooking time down to 6 minutes). Add asparagus to pot and cook until bright green and pasta is al dente about 4 minutes. Reserve 1 cup cooking water, drain pasta and asparagus, and return to pot.
Whisk peanut butter, vinegar, oyster sauce, chili-garlic sauce, ginger, sesame oil, and 1/2 cup pasta cooking water in bowl until smooth. Add peanut butter mixture and chicken to pot and toss to combine, adding reserved pasta water as needed. Serve immediately while sauce is still creamy.
Pin It!

Judds' Breadsticks


I love homemade breadsticks and these are my favorite. They come from a family cookbook I was given as a gift. They are really simple and I've never had a problem with them rising. They are chewy and tender and you can flavor them however you want. I use the green parmesean (because I think it sticks more evenly than fresh) and a little garlic salt w/ parsley. They are best straight from the oven or warmed in the microwave. They are extremely big so I usually cut them in half before twisting them and only do half a batch. Makes 14-16.
Judd's Breadsticks
4 cups hot tap water
3 Tablespoons yeast
1/3 c. granulated sugar
3 tsp. salt
8-10 cups flour
melted butter (for brushing)
Seasonings (parmesean, garlic salt, etc.)
Mix first 4 ingredients together. Gradually add flour until stiff. Let raise for 1/2 an hour. Roll out into 1/2 inch thick and cut into strips two inches wide with pizza cutter ( I also cut them in the middle because they are super long). Fold into three's and twist, pinching ends. Roll (or brush) in melted butter and place on baking sheet. Sprinkle with garlic salt and parmesean cheese. Let raise until doubled. Bake at 400 degrees for 15 minutes.
Pin It!

Wednesday, April 15, 2009

Chili Con Queso Revved Up


This is the Pioneer Woman's version of Chili Con Queso. It is a sausage and velveeta dip with the addition of green chilies and jalepeno. I loved the extra heat from the jalepenos and green chilies. Perfect for superbowl or mexican night.


Chili Con Queso Revved Up


from Pioneer Woman


2 lb. package Velveeta


1 package Jimmy Dean Hot breakfast sausage


1/2 onion, chopped


1 can rotel original or hot, depending on how hot you want it (I used original)


1 7 oz. can diced green chilies


1-3 jalepenos,diced again use your taste as a guide (I used 2 but took the seeds out)


Brown sausage and onion. Drain. Cut Velveeta into cubes and add to warm skillet.Add Rotel and green chilies and stir together over low heat until melted.Add jalepenos, stir together and serve warm with tortilla chips or Fritos. Keep warm in crock pot or chafing dish while serving. Can be refrigerated or frozen and reheated.


Pin It!

Honey Ham Glaze


I have a confession to make. It was the day before Easter and I a little unhappy because we had to use the ham my husband was given for Christmas. Just one of those big boneles ones. Iknow, spoiled. Anyway, instead of going to Honey Baked Ham my sweet husband bought us an electric knife and promised me a thinly sliced ham, just like I like it, for Easter. I already had this recipe for the glaze and I'm glad I didn't succumb to the pressure. This turned out just as great as any ham I've ever had. Sweet with a little spice from the cloves. Goes to show, with a little creativity you can create something special out of something ordinary.

Honey Ham Glaze
from Allrecipes.com


5 pounds ready-to-eat ham
1/4 cup whole cloves
1/4 cup dark corn syrup
2 cups honey
2/3 cup butter


DIRECTIONS


Preheat oven to 325 degrees F (165 degrees C).
Score ham, and stud with the whole cloves. Place ham in foil lined pan.
In the top half of a double boiler, heat the corn syrup, honey and butter. Keep glaze warm while baking ham.
Brush glaze over ham, and bake for 1 hour and 15 minutes in the preheated oven. Baste ham every 10 to 15 minutes with the honey glaze. During the last 4 to 5 minutes of baking, turn on broiler to caramelize the glaze. Remove from oven, and let sit a few minutes before serving.


*I sliced the ham thinly, instead of scoring it, and then just basted it every 15 minutes. I also used an 8 lb. ham but kept the amount of the glaze the same. Just made sure to adjust baking time. It should say on the package how long to cook per pound.
Pin It!

Tuesday, April 14, 2009

Smoked Ham, Gruyere, and Caramelized Onion Frittata


I had some gruyere cheese leftover from a mac and cheese I had made and found this recipe on Food Network. It was perfect for Easter Breakfast along with the Sparkling Punch and some Holiday Buns. It was really similar to a breakfast casserole but I thought the texture was much better. It looks like you spent a lot of time in the kitchen but in reality it comes together pretty quickly. I made sure to dice my potatoes really small so they would cook fast. I didn't bother with the sour cream on the side.

Ingredients
8 extra-large eggs (I used 9 large eggs)
2 tablespoons heavy cream
1 cup grated Gruyere cheese
Kosher salt and freshly ground black pepper
1 tablespoon unsalted butter
1 small onion, diced
4 small red potatoes, diced
1 cup diced smoked ham or Canadian bacon
1 cup grated Parmigiano-Reggiano, for finishing top
1/4 cup sour cream
1 bunch chives, chopped


Directions

Preheat oven to 400 degrees F.
In a large bowl, whisk together eggs, cream, Gruyere cheese, salt, and pepper until foamy. Melt butter in a cast iron pan over medium heat. Add the onion and potatoes and cook thoroughly. Pour the egg mixture over the top. Pull the edges away from the sides of the pan with a spatula so the eggs flow to the bottom of the pan. When the frittata is half set, add the ham.
Transfer the pan to the heated oven. Bake for 10 minutes until puffed and golden. Shower with grated Parmesan and serve garnished with sour cream and chives
Pin It!

Sparkling Punch

This was what I served with Easter Breakfast. It was perfect. I chose to go with the ginger ale because I am a big sweet tooth. It was perfect and I would serve this again. It tasted a lot like a carbonated pink lemonade but not as tart. I think it would be pretty in a big punch bowl with slices of lemons and limes.

Sparkling Punch

Prep: 5 min., Chill: 1 hr. For a sweeter finish, substitute ginger ale for club soda.

Yield
Makes about 9 cups

Ingredients

1 (12-oz.) can frozen pink lemonade concentrate, thawed
4 cups white cranberry juice cocktail
1 qt. club soda, chilled
Garnish: fresh mint sprigs
Preparation

1. Stir together lemonade concentrate and cranberry juice cocktail in a large pitcher. Cover and chill at least 1 hour or up to 24 hours. Stir in club soda just before serving. Garnish, if desired.


Pin It!

Monday, April 13, 2009

Twice Baked Potato Casserole


This was another dish we had for Easter and really loved. I've made it before and like to use this when I want something different from mashed potatoes. It is great for feeding a crowd. Our family hardly made a dent in it. They are similar to the loaded mashed potatoes at Texas Roadhouse if you've ever eaten there. They are super yummy with green onion, bacon, two different kinds of cheese and sour cream. I made these the day before and then just took them out of the refrigerator a couple of hours before I was ready to bake them. You could easily cut the recipe in half. One more note, I was making too many things at a time and let my potatoes cool. It was a lot harder to get them out of the skins once they were completely cool. If you like perfectly smooth mashed potatoes you might want to prepare them the way I have noted at the bottom.


Twice Baked Potato Casserole
from Emeril Lagasse


10 large russet baking potatoes (about 7 pounds total)
8 tablespoons (1 stick) plus 1 tablespoon unsalted butter, at room temperature
1 cup sour cream
1/2 cup heavy cream
2 teaspoons salt
1 1/2 teaspoons freshly
ground black pepper
3/4 pound bacon, cooked until crisp and crumbled
1/2 pound sharp white Cheddar, cut into 1/2-inch cubes
3/4 pound mild Cheddar, grated (3 cups)
1/2 cup finely chopped green onions
3 eggs, lightly beaten
Directions
Preheat the oven to 400 degrees F.
Scrub the potatoes well and rinse under cool running water. Pat dry with paper towels and prick the potatoes in several places with a fork. Place the potatoes in the oven and bake for 1 hour to 1 hour and 15 minutes, or until tender. Remove from the oven and set aside on a wire rack until cool enough to handle.
When the potatoes have cooled, cut each potato in half and, using a spoon or a melon baller, scoop the flesh out of the skins, leaving as little flesh as possible. Place the potato flesh in a large bowl and add 1 stick of the butter, the sour cream, heavy cream, salt, and pepper and mash until chunky-smooth. Add the bacon, cubed white Cheddar, half of the grated Cheddar, the green onions, and eggs and mix thoroughly.
Butter a 9 by 13-inch casserole with the remaining tablespoon of butter and reduce the oven temperature to 375 degrees F.
Place the seasoned potato mixture in the prepared casserole and top with the remaining grated Cheddar. Bake for 35 to 40 minutes, or until bubbly around the edges and heated through and the cheese on top is melted and lightly golden. Serve hot


*If it seems easier you could just peel and boil the potatoes (like you would do for mashed potatoes) and then continue making them that way. If you don't like any lumps this might be a better way to prepare them.*


Pin It!

Classic Pasta Sauces

My mother-in-law Cora is an amazing cook, I keep telling her she should open a restaurant. She is Filipino, but her cooking doesn't stop there. She can cook everything from authentic Chinese dishes to awesome Italian. Here are her 3 go-to recipes for pasta sauces. I've had them all and they are delicious!

Cora’s Alfredo Sauce
1 quart Heavy Cream
10 Eggs
3 cubes Butter
½ lb. Bacon, cooked & chopped
½ cup Parmesan Cheese

Mix all ingredients in medium saucepan until heated through. Garnish with chopped parsley.

Cora’s Marinara Sauce
2 cans Whole Tomatoes, blended in blender
1 small can Tomato Paste
4 Cloves Garlic, chopped
1 tsp. Oregano
5 leaves Fresh Basil
1 tbsp. Brown Sugar
Salt & Pepper to Taste

Mix all ingredients in medium saucepan until boiling.

Cora’s Pasta Bolognese Sauce
2 cans Whole Tomatoes, blended in blender
1 small can Tomato Paste
5 leaves Fresh Basil
1 tbsp. Brown Sugar
1 Green Pepper, chopped
3 Carrots, chopped
3 Celery Stalks, chopped
3 lb. Lean Ground Beef
Garlic Cloves, chopped
1 Onion, chopped

Brown beef, strain. Mix beef and remaining ingredients in medium saucepan until boiling.
Pin It!

Cherries Jubilee


We had some friends over for dinner last weekend for barbeque, so I wanted something simple for dessert that would go well with dinner. I came across a recipe for Cherries Jubilee and it sounded perfect! It almost tastes like warm cherry pie filling poured on top of cold vanilla ice cream. One note, since the cherries are warm, you want the ice cream to be very cold so it doesn't melt right away. It is easiest to scoop it into bowls, and then put the bowls back into the freezer until you are ready for dessert. It was so delicious and so easy, definitely a keeper.

Ingredients:
2 cans (each 15.5 oz.) pitted cherries, with juice
1/2 cup sugar
3 Tbs. unsalted butter, at room temperature
1/2 cup cherry brandy (optional)
1 pint vanilla ice cream

Directions:
In a searing pan or sauté pan over medium heat, combine the cherries and juice with the sugar. Cook, stirring occasionally, until the sugar is dissolved and the liquid is reduced by half, 3 to 5 minutes. Add the butter and stir until melted and completely incorporated.Remove the pan from the heat, add the brandy (if using) and return the pan to medium heat. Bring the mixture to a boil. The brandy may ignite but will eventually burn off. Divide the ice cream among 4 bowls and top with the cherry mixture. Serve immediately Serves 4.
Pin It!

Mini Tarts

We were having Easter dinner with my husband's family, and everyone likes something different for dessert, so I decided to make an assortment of tarts for dessert. I made chocolate ganache, banana creme and cream cheese tarts. Then, I topped each one with either assorted fruit or whipped cream and nuts. They were so delicious, everyone was fighting over which one they wanted!

Basic Tart Dough
Adapted from Williams Sonoma
Ingredients:
2 egg yolks
4 Tbs. very cold water
2 tsp. vanilla extract
2 1/2 cups unbleached all-purpose flour
2/3 cup sugar
1/2 tsp. salt
16 Tbs. (2 sticks) cold unsalted butter, cut into 1/4-inch cubes

Directions:
Preheat oven to 400 degrees. In a small bowl, stir together the egg yolk, water and vanilla; set aside. Stir together the flour, sugar and salt in a mixer bowl. Add the butter and beat on medium-low speed until the texture resembles coarse cornmeal, with butter pieces no larger than small peas. Add the egg mixture and beat just until the dough pulls together. Transfer the dough to a work surface, pat into a ball and flatten into a disk. To roll out the dough, on a lightly floured board, flatten the disk with 6 to 8 gentle taps of the rolling pin. Lift the dough and give it a quarter turn. Lightly dust the top of the dough or the rolling pin with flour as needed, then roll out until the dough is about 1/8 inch thick. Use a small, sharp knife to cut out a round or rounds 1 inch greater in diameter than your tart pans. Bake for 10 minutes. Let cook 5 minutes in pan, then remove from pan and cool completely on a wire rack.

Cream Cheese Tart Filling
Ingredients:
8 oz. cream cheese
½ cup powdered sugar
½ tsp. vanilla

Mix with beater. Spoon into center of cooled shells.

Toppings: Blueberries, Strawberries

Chocolate Ganache Tart Filling
Ingredients
8 oz. semisweet chocolate, finely chopped
2/3 cup heavy cream
2 Tbs. framboise or Chambord
4 Tbs. unsalted butter, at room temperature

Place the chocolate in a small bowl. In a small saucepan over medium-high heat, bring the cream just to a boil. Remove from the heat and stir in the framboise. Pour the cream mixture over the chocolate and let stand for 1 minute. Using a rubber spatula, slowly stir the mixture until smooth, then stir in the butter. Spoon the ganache into the center of the cooled shells, dividing evenly. Gently shake or tap the shells to smooth out the chocolate. Refrigerate until set, about 1 hour.

Toppings: Assorted Fruit, Whipped Cream & Nuts

Banana Cream Tart Filling
Ingredients
3 eggs
1/2 cup granulated sugar
Pinch of salt
3 Tbs. cornstarch
2 cups milk
3 Tbs. unsalted butter
1 1/2 tsp. vanilla extract
4 small ripe yet firm bananas
1/2 cup fresh orange juice

In a bowl, whisk together the eggs, granulated sugar and salt. Whisk in the cornstarch. Heat the milk almost to a boil. Whisk the hot milk into the egg mixture and return to the pan. Cook over medium heat, stirring, until thickened, 3 to 4 minutes. Remove from the heat and stir in the butter and 1 tsp. of the vanilla. Strain through a sieve into a bowl and cover with plastic wrap placed directly on the custard; let cool.Cut the bananas crosswise into slices 1/2 inch thick. Place in a bowl and toss with the orange juice. Drain well and pat dry with paper towels. Stir into the vanilla custard, then pour into the pastry shell and smooth the top.

Toppings: Whipped Cream & Nuts
Pin It!
Related Posts Plugin for WordPress, Blogger...