Creating memories in the kitchen...One meal at a time.

Wednesday, August 1, 2012

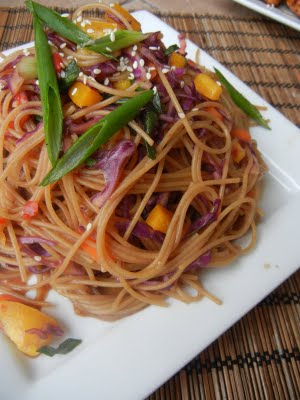
Asian Sesame Noodles With Marinated Chicken And Vegetables


Are you sick of heating up your kitchen for dinner? Are you trying to use your food storage to make meals that your family will actually eat? Do you like Asian food? If you answered yes to any of these questions, you've got to try this.

There were so many things I loved about this meal.

*I didn't have to turn the oven on.

* It used several ingredients from my food storage (noodles, sugar, oil, peanut butter).

*The veggies. Don't leave these out. They added a fabulous fresh taste and great texture. (I was a little skeptical about the red cabbage. I'm not a huge fan of it in salads but it was delish.)

* The marinade does double duty for the chicken and the noodles.

*Easily adapted to fit your family's taste. You could slice or dice the chicken and turn it into a one pot meal. Add broccoli, snap peas, snow peas,or bean sprouts. I think bok choy would be a great substitution if you don't like cabbage. You could also skip the chicken for a delicious vegetarian meal. 
*I love, love, loved all the different tastes and textures. The tender noodles, moist grilled chicken, fresh veggies, and the sweet and spicy sauce. Because it was summer, we ate the noodles slightly cooled instead of hot. Another great summer meal to add to my collection.

**Cook's Notes:
The chicken only needs to marinade while you are making this dish but can marinate for longer.

Don't be intimidated by the list of ingredients. Most, if not all can be easily found in your favorite grocery store. Also, a little goes a long way. You'll have plenty of leftovers to experiment with other delicious Asian dishes.


ASIAN SESAME NOODLES WITH MARINATED CHICKEN AND VEGETABLES


Marinade for chicken and sauce for noodles:
3 cloves garlic
1/2 c. rice vinegar
1/2 c. white vinegar
c. soy sauce
1 T. hoisin sauce
T. sesame oil
3 T. vegetable or canola oil
1-1 1/3 c. brown sugar (depending how sweet you like it--I of course use it all )
T. sesame seeds
T. lime juice
T. peanut butter
t. ginger (freshly grated or ginger powder)
t. red pepper flakes
T. sweet red chili sauce *My favorite is Mae Ploy brand*

16 oz. thin spaghetti noodles or angel hair pasta
1/2 c. green onions, sliced
1/2 c. carrots, sliced
1 red or orange bell pepper, sliced thinly
c. red cabbage, sliced thinly
4-5 chicken breasts


Combine in a bowl the ingredients for the marinade. If the peanut butter is too thick and won't whisk into the sauce well, microwave it for a few seconds (I microwaved mine for 15 sec.) until soft. Once marinade is smooth, take 1/2-3/4 c. of the marinade and place in a Ziploc bag or in a bowl with the chicken. Put chicken in the fridge until ready to grill. Set the rest of the marinade aside until the noodles are cooked.

Cook the noodles until tender and then drain and rinse. While noodles are cooking cut the vegetables very thinly (you don't want big chunks of vegetables, just thin slices). When the noodles are drained and cooked, place in a large bowl. Add the vegetables to the warm noodles (this will help soften the carrots). Pour the remaining dressing (not from the chicken, the extra) over the noodles. Let noodles sit until chicken is cooked.

Grill the marinated chicken until cooked through. Serve the grilled chicken along side the sesame noodles. Garnish the sesame noodles with sesame seeds and sliced green onions.


Source: Deal To Meals
Posted by: Sallie
Pin It!

Monday, July 16, 2012

Chicken Cordon Bleu Pasta


I have to confess. This summer I have been L-A-Z-Y in the kitchen.  My excuse is the heat. I mean really, it has been 111+ here! Turning the oven on isn't appealing in the least. Instead we've been doing a lot of grilling and stove top cooking. But after reading through this recipe and discovering that it  required only 15 minutes of baking time, I decided to go for it.

Boy am I glad. I. All the flavors of chicken cordon bleu, with the addition of tender penne pasta. It's hands down my favorite meal I've made in a long time.

First, tender penne noodles are nestled in a divine, creamy, cheesy, alfredo like sauce. Next comes bite sized nuggets of tender chicken, a sprinkling of bacon, and delicious ham. The addition of bread crumbs on the top  finishes the dish beautifully.

The whole family loved it. In fact, it was such a hit that my oldest daughter has already requested it for her birthday dinner in January.

Served with a side salad and some nice steamed veggies, this is comfort food at it's best.

Chicken Cordon Bleu Pasta

Ingredients:

  • 10-12 oz. penne or ziti pasta (I used 12)
  • 2 cups heavy cream
  • 1 (8 oz) block cream cheese
  • 1/2 tsp. onion powder more or less to taste
  • 1/2 tsp. garlic salt more or less to taste
  • 1 1/2 cups shredded Swiss cheese, separated
  • 2 chicken breasts, cooked and cut into strips or bite sized pieces
  • 3/4 cup bacon, cooked and chopped
  • 3/4 cup diced ham
  • bread crumbs (I used the Italian flavored ones)

INSTRUCTIONS

  1. Cook pasta according to its package's directions. Drain. I always add a little olive oil after I drain it and stir in around so the pasta noodles don't stick together or the pot.
  2. Heat cream cheese on stove over medium low heat until melted. Stir in heavy cream. Stir until completely combined. Add onion powder and garlic salt until it tastes how you would like it to. Stir in cheese until smooth consistency.
  3. In a 9x13, layer noodles, chicken, bacon and ham. Pour sauce over top. Sprinkle top with 1/2 cup cheese and bread crumbs.
  4. Bake at 350 degrees F for 15 minutes or until heated through.
Recipe Source: Chef in Training
Posted by: Sallie
Pin It!

Tuesday, July 10, 2012

No Bake Energy Bites


I enrolled my toddler in a little cooking class called Snack Attack.  It is a fun little 30 minute class that includes a story and preparing a corresponding snack.  She came home with the recipe for these yummy little energy bites one day and I knew they had to be good because she had eaten all of them in class!  They are easy to make and very delicious.  Perfect for a snack on the go.

No Bake Energy Bites
from smashedpeasandcarrots.blogspot.com

Ingredients:
1 cup oatmeal
1/2 cup peanut butter (or other nut butter)
1/3 cup honey
1 cup coconut flakes
1/2 cup ground flaxseed
1/2 cup mini chocolate chips (you can also substitute raisins or dried cranberries for a healthier version)
1 tsp vanilla

Directions:
Mix everything above in a medium bowl until thoroughly incorporated. Let chill in the refrigerator for half an hour. Once chilled, roll into balls and enjoy! Store in an airtight container and keep refrigerated for up to 1 week.  Makes 18-20 bites.

Posted by:  Julia
Pin It!

Monday, July 2, 2012

Restaurant Style Salsa


Picture From The Pioneer Woman


We love Mexican food and can never seem to get enough. I LOVE this salsa recipe. It's quick, easy, and delicious. The only problem is, the recipe calls for a can of diced tomatoes with jalapenos which only certain stores carry and that can be a pain. Not wanting to make a special trip for one ingredient, I decided to give this recipe a try. It's fantastic! It reminds me a lot of Chili's salsa which is the best! 

Restaurant Style Salsa                                                                                                               Printable Recipe


Ingredients

  • 1 can (28 Ounce) Whole Tomatoes With Juice
  • 2 cans (10 Ounce) Rotel (diced Tomatoes And Green Chilies)
  • 1/4 cup Chopped Onion
  • 1 clove Garlic, Minced
  • 1 whole Jalapeno, Quartered And Sliced Thin
  • 1/4 teaspoon Sugar
  • 1/4 teaspoon Salt
  • 1/4 teaspoon Ground Cumin
  • 1/2 cup Cilantro (more To Taste!)
  • 1/2 whole Lime Juice
  • Preparation Instructions

    Note: this is a very large batch. Recommend using a 12-cup food processor, or you can process the ingredients in batches and then mix everything together in a large mixing bowl.
    Combine whole tomatoes, Rotel, onion, jalapeno, garlic, sugar, salt, cumin, lime juice, and cilantro in a blender or food processor. Pulse until you get the salsa to the consistency you'd like---I do about 10 to 15 pulses. Test seasonings with a tortilla chip and adjust as needed.
    Refrigerate salsa for at least an hour. Serve with tortilla chips or cheese nachos.
    Recipe Source: Pioneer Woman
    Posted by: Sallie
    Pin It!

    Thursday, June 28, 2012

    Paula Deen's Lot's O' Meat Lasagna


    In case you haven't noticed, and not  intentionally, I've been on a kick lately. Trying to find some good old-fashioned, basic, go-to recipes. I love trying new recipes and different versions of our families favorites, but in the hustle and bustle of everyday life, it's so nice to have a recipe you know you can depend on to give you great results every time. My latest quest ?Lasagna.

    I have a few lasagna recipes I really like. The Pioneer Woman's recipe, this amazing version that I usually save for company or special occasions, and this fun mexican version. Although they are all delicious in different ways, I was still on the lookout for something new.

    Then as luck would have it, when my friend Andrea and I were planning what to feed our boy's soccer team and some of their families at an upcoming tournament, she suggested a lasagna recipe her brother had e-mailed her. After reading over the ingredients, I had a feeling it was going to be good.

    After tasting it, I had to agree, it was delicious. I loved the combination of both ground beef and sausage. The addition of ricotta as well as cottage cheese ? Let's just say it totally makes the lasagna. The soccer boys and their families devoured it. It's a keeper.

    Lots O'Meat Lasagna

    Ingredients
    • 1 1/2 pounds lean ground beef (the original recipe calls for ground chuck so do whatever you like best)
    • 1 pound ground Italian sausage
    • 1 onion
    • 2 cloves garlic, minced
    • 2 teaspoons ground oregano
    • 1 teaspoon ground basil
    • 1/4 teaspoon salt
    • 1/4 teaspoon pepper
    • 1 (14.5-ounce) can diced tomatoes with basil, garlic, and oregano *we don't like chunks of tomatoes so I puree this. Sometimes I add a little more if the sauce looks too dry)
    • 2 (15-ounce) cans tomato sauce
    • 1 (6-ounce) can tomato paste
    • 1 1/2 cups small curd cottage cheese
    • 1 16 oz. container ricotta cheese
    • 1 (5-ounce) package grated Parmigianno-Reggiano
    • 2 tablespoons freshly chopped parsley leaves
    • 2 large eggs, lightly beaten
    • 9-12 oven-ready lasagna noodles (Barilla is my favorite. see cooks note at bottom)
    • 2 (8-ounce) packages shredded mozzarella *

    Directions

    Preheat oven to 350 degrees F.
    In a large saucepan, combine ground chuck, sausage onion and garlic. Cook over medium heat until meat is browned and crumbled; drain.
    Return meat to pan and add oregano, basil, salt and pepper. If desired, puree tomatoes in food processor. Add tomatoes or tomato puree, tomato sauce and paste. Bring to a boil, reduce heat and simmer 30 to 45 minutes.( If the sauce looks too dry, I add a little more of the tomato puree.)
    In a small bowl, combine cottage cheese,ricotta, Parmesan, parsley, and eggs.
    Spoon 1/4 of sauce into bottom of a 13 by 9 by 2-inch baking pan. Place 3 uncooked lasagna noodles on top of sauce. Do not overlap noodles. Spread 1/3 of cottage cheese mixture over noodles, top with 1/4 of sauce and 1/3 mozzarella cheese. Repeat layers, ending with sauce, reserving 1/3 of mozzarella cheese.
    Bake 45 minutes, covered in foil. Remove foil, top with remaining cheese and bake 15 minutes or until hot and bubbly. Let rest 10 minutes before serving.
    **Cooks Notes 


    If you use Barilla brand of oven ready lasagna noodles, you will need to use 12 noodles because they are fatter and shorter. When I halved the recipe for 8x8 pan I used about 6 noodles.


    I  never use pre-grated cheese. They use a substance on it to keep it from clumping which keeps it from melting as nicely as freshly grated cheese.


    Recipe Source: adapted from Paula Deen
    Posted by: Sallie

    Pin It!

    Tuesday, June 26, 2012

    My Go-To Brownies


    I love brownies. Always have, always will. Great for  picnics and potlucks, packed in lunches, with a nice tall glass of cold milk or nestled in a bowl with some silky hot fudge sauce and vanilla ice cream. Yum.

    For a long time this Paula Deen version reigned as my favorite. Until I made these. Don't get me wrong, I still love Paula's version and make them quite often but these babies are everything I love in a brownie. Fudgy, moist, dense without being too heavy, and the kicker---little pockets of chocolate chips  in every bite.

    Considering that during marathon season last year my husband and I consumed at least 10 pans of these babies, I think we can now claim to be experts on the subject. I'd make a batch on Saturday night, let them firm up in the fridge overnight and the next day cut them into bite sized pieces, perfect for snacking on all day long.

    *Although I haven't gotten around to making it, I've included the turtle variation below.*

    Turtle Brownies


    Makes 16 brownies

    Ingredients
    10 tablespoons (1 1/4 sticks) unsalted butter, plus extra for greasing the pan
    1 1/2 cups sugar
    1/4 cup water
    24 ounces good quality, semisweet chocolate chips
    5 eggs
    1 1/2 cups flour
    1/2 teaspoon sea salt
    1/2 teaspoon baking soda
    1 teaspoon pure vanilla extract

    Directions
    Preheat oven to 350 degrees. Grease a 13x9x2 pan with butter.
    In a large saucepan, melt the butter over medium heat. Add the sugar and water, and bring to a boil. Remove from the heat and add 12 ounces of the chocolate, stirring until smooth. Whisk in the eggs one at a time, making sure each is incorporated before adding the next. Combine the dry ingredients and mix gently into the chocolate mixture. Stir in the remaining chocolate and vanilla.
    Pour the batter into the prepared pan and bake until the center feels just firm to the touch, about 30-35 minutes. Cool on a wire rack. While brownies are cooling, prepare the topping.

    Caramel Pecan Topping Ingredients

    • 1 1/2 cups sugar
    • 2/3 cup light corn syrup
    • 6 tablespoons water
    • 2/3 cup heavy cream
    • 2 teaspoons vanilla extract
    • 3 cups pecan halves and pieces

    Directions

    In a heavy saucepan, bring the sugar, corn syrup, water and salt to a boil over medium heat and stir until the sugar dissolves. Stop stirring and let the caramel cook until it turns golden, 10-15 minutes. Remove the pan from the heat and carefully add the cream and vanilla. The hot caramel may spatter when you add the cream, so be careful. When the caramel stops bubbling excessively, stir until smooth, and then stir in the pecans. Spread the topping over the cooled brownies in an even layer. Let cool, then cut brownies into 16 squares.

    Recipe Source: The Family Kitchen Cookbook

    Posted by: Sallie
    Pin It!

    Tuesday, June 12, 2012

    Grilled Balsamic-Garlic Crusted Pork Tenderloin


    Grilled Balsamic-Garlic Crusted Pork Tenderloin

    4-5 garlic cloves, finely minced or crushed
    2 tablespoons balsamic vinegar
    2 1/2 teaspoons coarse salt
    1/2 teaspoon freshly ground pepper
    2 tablespoons olive oil
    2 pork tenderloins (about 1¼ pounds each)
    2 tablespoons canola oil (if preparing in oven)

    Directions:

    Stir together garlic, balsamic vinegar, salt, pepper, and olive oil in a small bowl. Rub the paste all over pork. If you like or have the time, marinate overnight. If not, no worries, it will still be great!
    Grill preparation:
    Sear the tenderloins on all sides, then grill for about 20-30 minutes, rotating every 10 minutes, until the internal temperature is 160 degrees. Try to let it rest before slicing.
    Oven preparation:
    Preheat oven to 400 degrees.
    Heat canola oil in a large, heavy saute pan over medium-high heat. Working in batches if necessary, add pork, and brown all over, about 4 minutes.
    Transfer pan to oven. Roast pork, turning occasionally, until the internal temperature is 160 degrees, about 20 minutes. Transfer pork to a cutting board, and try to let it rest 10 minutes before slicing.
    Recipe & Picture Source: Kitchen Confidante 

    Posted by: Sallie

    Pin It!
    Related Posts Plugin for WordPress, Blogger...