Creating memories in the kitchen...One meal at a time.

Thursday, May 27, 2010

Shrimp Stiry Fry with Snow Peas and Coconut Curry Sauce

I have been on a serious Asian food kick lately and this is one of the new recipes I tried. The coconut curry sauce was delicious and creamy and the tender shrimp went great with the crunchy snow peas and red peppers. If you like a lot of sauce I would suggest doubling the sauce recipe. The best part of this meal is it only takes about 30 minutes and doesn't call for any wierd ingredients. I have found red curry paste in every grocery store I shop at in the Asian Isle by the Thai food. We love this with either brown rice or Jasmine Rice.


Shrimp Stir Fry with Snow Peas and Coconut Curry Sauce
The Best 30-Minute Recipe

1 recipe Coconut-Curry sauce (below)
1 pound shrimp, peeled and deveined
2 teaspoons soy sauce
2 tablespoons vegetable oil
1 bell pepper, cored, seeded, and sliced (any type will do)
8 ounces snow peas, strings removed
1 cup bean sprouts
3 garlic cloves, minced
1 tablespoon grated fresh ginger

Prepare the sauce and set it aside . Toss shrimp with soy sauce. Heat 2 teaspoons of oil in a 12-inch nonstick skillet over medium heat until just smoking. Add shrimp and cook, stirring occasionally and breaking up any clumps, until curled and lightly browned, about 1 1/2 minutes. Transfer the shrimp to a clean bowl.

Add 1 more tablespoon of oil to the pan and return to medium heat until shimmering. Add bell pepper and cook, stirring occasionally, until crisp-tender, about 2 minutes. Stir in snow peas and bean sprouts and cook for one more minute.


Clear the center of the pan and add remaining 1 teaspoon oil, garlic and ginger. Cook, mashing garlic mixture into the pan with the back of a spatula, until fragrant, about 30 seconds. Stir in cooked shrimp. Whisk sauce to recombine and add to pan, bringing to a simmer. Cook until the sauce thickens, 1 to 2 minutes. Serve immediately.


Coconut Curry Sauce (double if you like a lot of sauce)
1 cup coconut milk (I used light coconut milk with great results)
1 tablespoon fish sauce
1-2 teaspoons red curry paste (I used 2 teaspoons )
1 teaspoon light brown sugar
1 teaspoon cornstarch

Combine ingredients in medium bowl and use as directed.

Posted by: Sallie
Pin It!

Monday, May 24, 2010

Pesto Chicken Pizza with Feta and Pine Nuts


While I have a hard time declaring something to be my all time, without a doubt, absolute favorite, this pizza is without question in my top 3 favorite pizzas of all time and for sure my all time favorite homemade pizza. The crust is amazing and the whole pizza tastes like something you would get from an upscale pizza restaurant. Plain old pizza sauce is replaced with delicious pesto and topped with a juicy lemon grilled chicken, crisp red onion slices, creamy feta and mozzarella cheeses, crunchy toasted pine nuts and thinly sliced tomatoes. I have also replaced the sliced tomatoes with sun dried tomatoes which is equally delicious. See below for a few of my tried and true tips for getting the best results when making pizza.
Pesto Chicken Pizza
The Sisters Cafe
Pizza Dough- this (the Slow Rise Pizza Crust) is my go to recipe


Pesto- purchased or homemade


4 oz. Feta Cheese


Lemon Grilled Garlic Chicken to taste. I usually use 1 1/2-2 cups for a large pizza


1/2 red onion cut into thin slices


2 large tomatoes thinly sliced- I like Romas


Mozzarella cheese - to your taste


Toasted Pine Nuts- to your taste
Parmesan cheese freshly grated, if desired
Preheat oven to 475 degrees and place baking stone in to heat for 45 minutes to 1 hour. Roll out pizza dough on pizza paddle. Top with pesto spreading liberally to the outer edges of the dough. Top with remaining toppings and cheese (or put on 2/3 of topping mixture, cheese and then the remaining 1/3 toppings.) Top with some freshly grated Parmesan cheese. Transfer pizza to baking stone and bake for 10-15 minutes or until nicely browned. I made 6 good sized personal pizzas with this dough recipe, two of which were this recipe.
*Tips for delicious homemade pizza*
Just like any other type of cooking or baking sometimes is takes a little trial and error to get the best results. Here is what works for me
1- preheat your oven to between 475-500 degrees. It sounds hot but it really works best.
2- put your baking stone in the oven for at least 45 minutes before baking the pizza. It needs to be nice and hot.
3-Experiment with what works well in your oven. I have read that baking on the bottom rack at 500 degrees works well but the couple of times I tried it my pizza dough was not done inside. I have found that a 475 degree oven with the pizza in the middle rack and baking for 12-15 minutes works best in my oven. It gets the dough perfectly done and the cheese gets nicely browned without being burnt.
4- invest in a baking stone. It really make all the difference.
5- Never use pregrated cheese. It has chemicals in it which keep it from melting as well as the blocks of cheese.
Posted by: Sallie


Pin It!

Tuesday, May 18, 2010

Honey-Hoisin Pork Tenderloin


Have I mentioned how crazy this time of year is? Although I enjoy seeing my little charges dancing, singing, graduating (even if it is only from preschool and kindergarten) and playing sports it can be downright exhausting and finding time for dinner has been a real challenge.

This recipe fit the bill for a quick yet delicious and healthy weeknight meal. Although you'll have to plan ahead a little because of the 30 minute marinade, once ready to cook the majority of the prep work is already done. The pork turned out tender and juicy and the honey-hoisin sauce was very flavorful. Because it's such a basic recipe the options for side dishes are endless. Asian noodles, potatoes in any form, a green salad, asparagus or green beans, whatever your little heart desires. The leftovers are great and could be used for a delicious sandwich or asian type wrap. If you like a little kick try adding a few red pepper flakes to the sauce to kick it up a notch. If you like a lot of sauce you might want to double the sauce recipe.


Honey-Hoisin Pork Tenderloin
Cooking Light


Yield: 4 servings (serving size: 3 ounces pork and about 2 teaspoons honey mixture)

*The serving sizes are fairly small so plan accordingly*


Ingredients
2 tablespoons sliced green onions
2 tablespoons hoisin sauce
2 tablespoons low-sodium soy sauce
2 tablespoons sage honey
1 tablespoon hot water
2 garlic cloves, minced
1 (1-pound) pork tenderloin, trimmed
1/4 teaspoon salt
Cooking spray
1/2 teaspoon sesame seeds


Preparation
Preheat oven to 400°.
Combine first 6 ingredients in a small bowl. Pour 1/4 cup honey mixture into a large zip-top plastic bag; reserve remaining honey mixture. Add pork to bag; seal and marinate in refrigerator 30 minutes, turning bag occasionally.
Remove pork from bag; discard marinade. Sprinkle pork with salt. Heat a large ovenproof skillet over medium-high heat. Coat pan with cooking spray. (I used a 9 x 11 pan and lined it with foil .Any of the sauce that drips off will get seriously baked on the bottom of the pan.)Add pork; cook 2 minutes, browning on all sides. Brush 1 tablespoon reserved honey mixture over pork; sprinkle with sesame seeds. Place skillet in oven. Bake at 400° for 20 minutes or until a thermometer registers 160° (slightly pink) or until desired degree of doneness.
Place pork on a platter; let stand 5 minutes. Cut pork across the grain into thin slices. Drizzle with the remaining honey mixture.


Nutritional Information
Calories:
195 (20% from fat)
Fat:
4.3g (sat 1.4g,mono 1.9g,poly 0.6g)
Protein:
24.7g
Carbohydrate:
13.6g
Fiber:
0.5g
Cholesterol:
74mg
Iron:
1.7mg
Sodium:
633mg
Calcium:
12mg


posted by: Sallie
Pin It!

Monday, May 17, 2010

Chocolate Chip Cupcakes and another Birthday


As I was sitting in church yesterday it suddenly hit me that I only have 7 years left before my son will be 18 and off on his own. Seven years may seem like a long time to some-- 7 years of no chocolate, 7 years without books or diet coke --could seem like eternity but when I think of how fast these past 11 years have flown by it made me realize how much I have to cherish this time with not only my son but all of my children.
While I love all of my kids equally and beyond words Christian is my firstborn and will always hold that special place in my heart. He is an amazing big brother to his three little sisters and still sweet as can be.
He loves all sports and but has decided basketball is his favorite. Despite his height (what can I say, when you have a 5 foot 1"mother you're probably not going to be Michael Jordan) he is amazing on the court and I love to watch him play. He's been watching ESPN since he was nine and I am constantly deleting the millions of sports games he has dvr'd so he can study the plays. Because he's the only boy in our family he and his Dad are best pals and can be found playing or watching some type of sport almost daily.
He just received his arrow of light award in scouting and was the only student in his class to complete the "Give me Liberty" program at school. I'm so proud of the little man he is becoming and even though it's hard to let go, it's so rewarding to see all the great things he is able to do on his own now. (Okay, the brag session is over. I'm sorry but I am seriously the worlds worst scrapbooker so I figure I need to make up for it somehow.)

Christian loves cookie dough in any form be it in ice cream, cookies or the spoonfuls he manages to sneak from the bowl, so I thought these would be perfect for his class treat. Whipping the egg whites produces a beautifully light and airy crumb and the chocolate chips studded throughout are divine! They were a huge hit and I had a classroom full of fifth graders mobbing me for seconds. These would also be delicious with any type of chocolate frosting or ganache.
Chocolate Chip Cupcakes with Chocolate Chip Frosting
Martha Stewart
Makes 30
3 1/4 cups plus 1 tbsp. sifted cake flour (not self-rising)
4 1/2 tsp. baking powder
1/4 teaspoon salt
7 ounces (1 3/4 sticks) unsalted butter, softened
1 3/4 cups sugar
1 cup plus 2 tablespoons milk
1 tablespoon pure vanilla extract
5 large egg whites, room temperature
2 cups semisweet chocolate chips
Chocolate Chip Frosting

Directions

Preheat oven to 350 degrees. Line standard muffin tins with paper liners. Whisk together 3 1/4 cups cake flour, the baking powder and salt. In a separate container (I used the measuring cup) mix milk and vanilla.
With an electric mixer on medium high speed, cream butter until smooth. Adding the sugar in a steady stream, bet until pale and fluffy. Reduce speed to low. Add flour mixture in three batches alternating with two additions of milk mixture, and beating until just combined after each.
In another bowl with an electric mixer on medium speed, whisk the egg whites until stiff peaks form (do not over mix). Fold one third of the egg whites into the batter to lighten. Gently fold in the remaining whites just until combined. (Don't be alarmed. The mixture will look really weird and you will think you've done something wrong. Be patient and keep gently folding until your arm is about to fall off and then it will come together!)
Toss chocolate chips with 1 tbsp. flour and gently fold into batter.
Divide batter evenly among lined cups, filling each one three quarters full. Bake, rotating tins halfway through, until cake tester inserted in centers comes out clean and the tops are springy to the touch, about 22 minutes. transfer tins to wire racks to cool completely before removing cupcakes. Cupcakes can be stored overnight at room temperature or frozen up to 2 months in air tight containers.
Frost with desired frosting. Can be refrigerated up to 3 days in airtight containers. Bring to room temperature before serving.
Chocolate Chip Frosting

Makes about 4-5 cups
2 cups semisweet chocolate chips
Basic Butter cream Frosting (see below recipe)

12 ounces (3 sticks) unsalted butter, softened
1 pound confectioners' sugar, sifted
1/2 teaspoon pure vanilla extract

Directions
Beat butter with a mixer on medium-high speed until pale and creamy, about 2 minutes.
Reduce speed to medium. Add sugar, 1/2 cup at a time, beating after each addition, about 5 minutes. (After every 2 additions, increase speed to high, and beat for 10 seconds then reduce speed to medium-high). Add vanilla, and beat until buttercream is smooth.
Fold chocolate chips into buttercream. Use immediately, or cover and refrigerate for up to 3 days. Bring to room temperature, and beat on low speed before using.
Posted by: Sallie
Pin It!

Sunday, May 16, 2010

Creamy and Delicious No Bake Lemon Cheesecake


I love lemons. They're so pretty, they smell amazing and you can use them in so many different ways. Lemons are something I ALWAYS have in my fridge. From marinades to zests for cookies or cakes, juice for that extra zing of flavor or a nice tall glass of fresh squeezed lemonade the possibilities go on and on. Spring just brings the lemon-lover out in me even more.

The latest issue of Cook's Country included this delicious recipe for a lemon no bake cheesecake. The picture looked amazing but I'll be honest. I was a little skeptical going in to this recipe because I am such a real deal, no substitutions for the real thing kind of girl. I was even secretly plotting back up dessert plans in my mind because heaven forbid the most important part of the meal wouldn't turn out!
Fortunately, it turned out even better than I ever could have expected. Creamy and light, lemony and delicious. Certain persons who will remain nameless might have even had seconds! Perfect for when the temperature is rising and turning on the oven in the last thing in the world you want to do. This recipe will go in my "it's a keeper file."

No Bake Lemon Cheesecake
slightly adapted from Cook's Country
Serves 12 to 16

CRUST :
9 whole graham crackers
5 tbsp. butter, melted
1 tsp. lemon zest
or
10 lemon sandwich cookies crushed
2 tbsp. butter, melted
1 tsp. lemon zest

CURD
1 large egg plus 1 egg yolk
1/4 cup sugar
Pinch salt
2 tablespoons lemon juice
1 tablespoon unsalted butter
1 tablespoon heavy cream
FILLING
1/4 cup lemon juice from 2 lemons
1 envelope (2 3/4 teaspoons) unflavored gelatin
1 1/2 pounds cream cheese , cut into 1-inch pieces and softened (3 8 oz. pkgs.)
3/4 cup sugar
Pinch salt
1 1/4 cups heavy cream , room temperature
1. Adjust oven rack to middle position and heat oven to 350 degrees. Process graham crackers or cookies in food processor until finely ground. Add butter and zest and pulse until combined. Press mixture into bottom of 9-inch springform pan. Bake until lightly browned and set, about 10 minutes. Cool completely on wire rack, at least 30 minutes.
2. While crust is cooling, whisk egg, egg yolk, sugar, and salt together in small saucepan. Add lemon juice and cook over medium-low heat, stirring constantly, until thick and puddinglike, about 3 minutes. Remove from heat and stir in butter and cream. Press through fine-mesh strainer into small bowl and refrigerate until needed.
3. Combine lemon juice and gelatin in small bowl and let stand until gelatin softens, about 5 minutes. Microwave until mixture is bubbling around edges and gelatin dissolves, about 30 seconds. Set aside.
4. With electric mixer on medium speed, beat cream cheese, sugar, and salt until smooth and creamy, scraping down sides of bowl, about 2 minutes. Slowly add cream and beat until light and fluffy, about 2 minutes. Add gelatin mixture and ¼ cup curd, increase speed to medium-high, and beat until smooth and airy, about 3 minutes.
5. Pour filling into cooled crust and smooth top. Following photos, pour thin lines of remaining curd on top of cake and lightly drag paring knife or skewer through lines to create marbled appearance. Refrigerate until set, at least 6 hours. Remove sides of pan. Serve. Cheesecake can be covered in plastic wrap and refrigerated for up to 3 days.
Posted by: Sallie
Pin It!

Friday, May 7, 2010

Light and Fluffy Whole Wheat Pancakes


I love pancakes but it seems like 5 minutes after I'm done I'm hungry again. Combine that with the fact that I have some seriously "wheat" suspicious family members and you've got a problem. I really like wheat bread, rolls, etc. but the rest of my family prefers white. I am slowly trying to add more whole grains to our meals but sometimes you just gotta be sneaky! These pancakes fit the bill. They are the best wheat pancakes I've ever had. Because they combine some white and some wheat flour they still taste nice and fluffy. I used whole wheat pastry flour which gave them even more of a light feel. Breakfast passed with no suspicious glances or questioning about the ingredients of the pancakes. In fact my 4 year old asked for seconds! Success, even if it was a little devious! The recipe also included a strawberry sauce which was just ok. If you're interested the recipe can be found here.


Whole Wheat Pancakes

Ellie Krieger

3/4 cup all-purpose flour
3/4 cup whole-wheat flour or for really light pancakes use whole wheat pastry flour
1 1/2 teaspoons baking powder
1/2 teaspoon baking soda
1/4 teaspoon salt
2 large eggs
1 cup lowfat buttermilk
1/2 cup nonfat milk
1 tablespoon honey
1/4 teaspoon vanilla extract

Confectioners' sugar, maple syrup, etc. for serving

Directions
Pre-heat the oven to 200 degrees F.
In a medium bowl, whisk together the dry ingredients (flour through salt). In another medium bowl, beat together the eggs, nonfat milk, buttermilk, honey and vanilla.
Preheat a large nonstick griddle or skillet over a medium-low flame. Stir the wet ingredients into the dry ingredients, mixing only enough to combine them. The batter will be somewhat lumpy. Use a 1/3 cup measuring cup pour the batter onto the griddle or skillet. Flip the pancake when the top is bubbling and it is golden brown on the bottom. Then cook until the other side is golden brown. Hold on an oven proof plate in the oven until the entire batch is ready. When all the pancakes are ready serve with desired toppings. Makes approx 8 really big pancakes.
Pin It!

Tuesday, May 4, 2010

Cheesy Cauliflower Bake


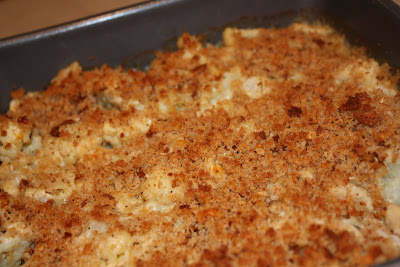
In my continuing love of Cook's Country Magazine here is another fabulous side dish. Cheesy, tender but not at all soggy nuggets of cauliflower mixed in with a deliciously light but creamy sauce and topped off by some buttery, garlic bread crumbs on top. I served this with the Honey Roasted Chicken, asparagus and some rolls. A perfect spring meal.


*I halved the recipe and used an 8 x 8 pan which was perfect for our family of 6*


Cheesy Cauliflower Bake
Serves 8 to 10


You will need about 4 pounds of cauliflower to yield 12 cups of trimmed florets.

3 slices hearty white sandwich bread , torn into pieces
1 cup shredded extra-sharp cheddar cheese
1 cup shredded Monterey Jack cheese
4 tablespoons unsalted butter , melted
3 garlic cloves , minced
Salt and pepper
2 tablespoons all-purpose flour
1 1/4 cups heavy cream
3/4 cup low-sodium chicken broth
2 large heads cauliflower , trimmed and cut into 3/4-inch florets (about 12 cups)
2 teaspoons dry mustard
1 teaspoon dried thyme

1. PREPARE TOPPING Adjust oven rack to middle position and heat oven to 450 degrees. Pulse bread, 2 tablespoons cheddar, 2 tablespoons Monterey Jack, 2 tablespoons butter, 1 clove minced garlic, ¼ teaspoon salt, and ¼ teaspoon pepper in food processor until coarsely ground.
2. MAKE SAUCE Heat remaining butter, remaining garlic, and flour in Dutch oven over medium heat, stirring constantly, until golden and fragrant, about 1 minute. Slowly whisk in cream and broth. Stir in cauliflower, dry mustard, thyme, ½ teaspoon salt, and ½ teaspoon pepper and bring to boil. Reduce heat to medium-low and simmer covered, stirring occasionally, until cauliflower is nearly tender, 6 to 8 minutes. Off heat, stir in remaining cheddar and Monterey Jack until incorporated.
3. BAKE CAULIFLOWER Pour mixture into 13 by 9-inch baking dish and top with bread crumbs. Bake until crumbs are golden brown and crisp, 10 to 15 minutes. Let cool 10 minutes. Serve.
MAKE AHEAD: The filling can be refrigerated, covered, for 1 day, after you've transferred it to the baking dish (step 3). Refrigerate crumb topping separately. Bring to room temperature before topping with bread crumbs and baking as directed.
Pin It!
Related Posts Plugin for WordPress, Blogger...