Pages

Thursday, October 28, 2010

Mini Meatloaves

Even though I have a family of six, none of us are huge eaters. Sometimes this can pose a problem as in we're having leftovers again! There's only so much you can eat of one food before wanting it to disappear.
That's why I was excited to find this mini version of a family favorite.

These mini loaves turned out moist and flavorful. I used a meatloaf mix (I had my butcher mix up the exact amount I needed) but you could easily make your own combination using equal amounts of ground beef and pork. The glaze added the perfect tang.

Not only did it make a perfect amount, instead of taking over and hour to cook, these mini loaves were on the table in about 30 minutes. It was fun to serve everyone their own little loaf and know that I wouldn't be stuck eating meatloaf for the rest of my life!


Mini Meatloaves
The Best 30-Minute Recipe

Makes 4- 5 mini meatloaves.

Meatloaves:

17-20 saltine crackers, crushed fine (about 2/3 cup)

1/4 cup whole milk

1/3 cup minced fresh parsley

3 tablespoons Worcestershire sauce

1 large egg

1 1/2 tablespoons Dijon mustard

1 teaspoon onion powder

1 teaspoon garlic powder

1 teaspoon salt

1/2 teaspoon pepper

1 1/2 pounds ground meat (meatloaf mix or equal parts ground beef and pork)

2 teaspoons oil  (I used canola oil)

Glaze:

1/2 cup ketchup

1/4 cup packed light brown sugar

4 teaspoons cider vinegar


Adjust an oven rack to the middle position and heat the oven to 500 degrees. Stir cracker crumbs, milk, parsley, Worcestershire sauce, egg, mustard, onion powder, garlic powder, 1 teaspoon salt, and 1/2 teaspoon pepper together in a large bowl. Add ground meat and combine until uniform. Shape mixture into 4-5 oval loaves.

Heat oil in 12-inch nonstick skillet over medium heat until just smoking. Brown meatloaves well on one side (about 3-5 minutes). Carefully flip loaves over and tidy up edges using a spatula . Brown on other side for about 3 minutes.

Meanwhile, mix glaze ingredients together until smooth, then spoon glaze over top of loaves. Put loaves on baking sheet ( I always put a sheet of foil under them to make clean up easier!) and bake until centers of loaves register 160 degrees, about 15 minutes. Serve.

Posted by: Sallie

Monday, October 25, 2010

Honey Whole Wheat Bread


One of my favorite parts of cooking is the challenge. I used to be a terrible bread and roll maker. I would end up with sticky, gooey, dough or really heavy, small, rock like rolls. Every once in awhile I would get lucky and have a batch turn out great. Now am I much more comfortable with yeast breads and (knock on wood) 99% of the time end up with great bread. Those of you who've made or tasted homemade rolls and bread know that there is no comparison to store bought!

So how did I go from being a bread making disaster to getting great results? Unfortunately there is no big, magic secret (that I know of anyway.) It all boils down to PRACTICE. Here are the few things I can share with you that have helped me.

1. Start with good recipes. I like to get my recipes from well known cookbooks, blogs (that I've made great recipes from before), and friends. Try to start out with very simple recipes and progress once you feel comfortable.

2. Invest in a thermometer. If you have recipes that call for a certain water temperature, it takes a lot of the guess work out of the process and will ensure that you are not either killing the yeast (by getting the water too hot) or not activating it enough (by not getting the water hot enough.)

3. Don't over or under flour your dough. This is where experience really comes into play. A dough that is too sticky won't rise properly while a dough that has too much flour results in tough, heavy rolls. Use your recipe as a guideline. If you feel you need to add more flour or water, do it in very small amounts and give it a minute to come together before adding more. Temperature, humidity, etc. all have an effect so use your best judgement. Once you have made a recipe multiple times, you will know what the dough should look like. *Melanie has a great yeast tutorial on her blog with photos and lots of helpful information. http://www.melskitchencafe.com/2009/11/tutorial-working-with-yeast.html

4. Practice, Practice, Practice. It's how you become successful at anything. Take a class or ask a friend who makes bread to help you.Don't get discouraged. I had a lot of failures! If I can do it, you can too.

Now, on to my recipe (which comes from The Sister's Cafe.) I have been promising myself for about 6 months that I would start making all of our bread. I finally got myself in gear and purchased a wheat grinder and some really good bread pans. I have been trying out different recipes and this one has been one of my favorites. The loaves turned out beautiful! I love using the white wheat flour. It has a much more mellow taste and even my kids (and maybe an unnamed husband) who hate wheat bread like this bread. It makes 5 loaves which is great because you can slice and freeze the leftovers. If you have an electric knife it works fantastically!

Yummy, Easy Whole Wheat Bread
The Sisters Cafe

Yield: 5 loaves

3 1/2 cups hot tap water (helps offset the cool can of milk)
1 (12oz) can evaporated milk
3 Tbs instant yeast (like SAF)
2/3 cup oil (I used canola)
1 cup honey (use the same measuring glass as the oil and the honey slides right out)
1 cup white flour
3 Tbs vital wheat gluten
2 Tbs dough enhancer (this is optional--I just happen to have some)
12 cups whole wheat flour (I used white wheat: approx 8c wheat berries= 12 c flour)
1 1/2 TBSsalt

*I ended up adding  1 cup of white flour and 1 cup of white wheat flour more than the recipe called for.*

Grind your wheat (in your electric wheat grinder) while getting everything else ready. Then, using a Bosch or other heavy duty mixer, combine ingredients in the order given, mixing well after half the flour, then add the other half of flour and salt. Add a little extra white flour as needed if dough is too sticky. Knead in mixer for 8 minutes. Dump out dough on your 'Rolpat' or if you don't have one, pour a little oil on your counter top and spread with your hand. Form into a long log, then divide into 5 loaves. Form each loaf into a log shape and place in medium sized nonstick bread pan. Press down the sides of each dough piece to fill the bottom of the pan, leaving the top round and smooth. Let rise in a warm spot until almost desired bread size. (about 1 hour). Bake in preheated 350 oven for 25-30 minutes. Remove from oven to wire racks and brush tops of hot loaves with butter, if desired. Let cool about 10 minutes, then remove from pans and let cool completely before slicing. (if you can wait that long!!)

Posted by: Sallie

Wednesday, October 20, 2010

My go-to Apple Crisp


Quite awhile back we had a women's church meeting with a delicious dinner. I was asked to make an apple crisp and given this recipe. Since then it has been my go-to recipe for apple crisp. I love the cinnamon sprinkled on the apples and the topping is the best! We love ours served warm with vanilla ice cream and caramel syrup drizzled on top.


Apple Crisp

Fruit Mixture:
8 cups peeled apples (I usually use granny smith)
2 tsp. cinnamon
2 Tbsp. water
2 tsp. lemon juice

Topping:
1 1/2 cups rolled oats
1 1/3 cups flour
1 1/3 cups firmly packed brown sugar
3/4 cup butter, softened

Heat oven to 375 degrees. Place apples in ungreased 9 x 13 baking dish. Sprinkle with cinnamon, water and lemon juice. In a large bowl, combine all topping ingredients; mix until crumbly. Sprinkle crumb mixture evenly over apples. Bake at 375 degrees for 35-40 minutes or until fruit is tender and topping is golden brown.

Posted by: Sallie

Tuesday, October 19, 2010

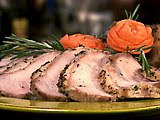
Herb Crusted Pork Tenderloin


Forgive me for not posting any new recipes in such a long time. Having a new baby makes finding time to cook really difficult, but I'm starting to get back into the swing of things, finally!

Here's a great tasting recipe that is so easy you can roast it while you make your side dish and vegetable and by the time it's done roasting, you've got a complete meal!

Herb Crusted Pork Tenderloin
By Paula Dean
Ingredients
1 (4-pound) boneless pork loin, with fat left on
1 tablespoon salt
2 tablespoons olive oil
4 cloves garlic, minced
1 teaspoon dried thyme or 2 teaspoons minced fresh thyme leaves
1 teaspoon dried basil or 2 teaspoons fresh basil leaves
1 teaspoon dried rosemary or 2 teaspoons minced fresh rosemary

Directions
Preheat oven to 475 degrees F.
Place the pork loin on a rack in a roasting pan. Combine the remaining ingredients in a small bowl. With your fingers, massage the mixture onto the pork loin, covering all of the meat and fat.

Roast the pork for 30 minutes, then reduce the heat to 425 degrees F and roast for an additional hour. Test for doneness using an instant-read thermometer. When the internal temperature reaches 155 degrees F, remove the roast from the oven. Allow it to sit for about 20 minutes before carving. It will continue to cook while it rests.

Posted by: Julia

Wednesday, October 13, 2010

Easy Cheesesteak Subs


When I made these the other night my husband just sat there staring for a minute and then said "you are amazing." I think that says it all.

Not only easy but pretty darn tasty. Make your man (and yourself) really happy and make these for dinner. By the way, these rolls are not optional. They highly contribute to the amazing deliciousness of these sandwiches.

Cheesesteak Subs
Adapted slightly from Cook's Country

Serves 4-6 depending on how much meat you use.

1 onion , halved and sliced thin
3 tablespoons unsalted butter
2 garlic cloves , minced
1/4 teaspoon dried oregano
1 tablespoon A-1 steak sauce, plus extra for serving (I added another tbsp. because we like a lot of sauce)
1 pound rare deli roast beef , cut into 2-inch strips
Salt and pepper
8 slices deli provolone cheese
4 (6-inch) sub rolls , split partially open lengthwise (or the above mentioned recipe shaped into 6 hoagie rolls)

1. Adjust oven rack to upper-middle position and heat broiler. Melt butter in skillet. Add onion and cook until softened and golden, about 8 minutes. Stir in garlic and oregano and cook until fragrant, about 30 seconds. Add A-1 sauce and beef to skillet and cook until heated through, 1 to 2 minutes. Season with salt and pepper.

2. Divide beef mixture among rolls. Top with cheese and broil on rimmed baking sheet until cheese is melted, about 2 minutes. Serve.

Posted by: Sallie

Saturday, October 9, 2010

Cook's Illustrated Classic Brownies


I have a major complaint. Sorry in advance to any restaurant owners in St. George but you need to know that there is not a single establishment in this town that makes a great brownie sundae. And I should know. It's got to be one of my all-time favorite desserts and my friend Kelly and I are pretty much the authorities when it comes to brownies.

The other night the chocolate craving hit and I knew I wanted a brownie sundae. Knowing that buying one would end up in disappointment I went in search of THE BROWNIE.I have a great brownie recipe here but they are really rich and take a little more time. I wanted just your classic, fudgy, full of chocolatey goodness brownie.

I found just what I was looking for! Moist, fudgy, and bursting with chocolate flavor.Perfect for picnics and lunch boxes. Delicious topped with vanilla ice cream, smothered in hot fudge and topped off with some real whipped cream!This will be my go to classic brownie. If you want to take this recipe up a notch it would be delicious with chocolate chips (or any other kind of chips you like)mixed into the batter.

Classic Brownies

Cook's Illustrated

Ingredients
1 cup pecans or walnuts (4 ounces), chopped medium (optional) I left these out
1 1/4 cups plain cake flour (5 ounces)
1/2 teaspoon table salt
3/4 teaspoon baking powder
6 ounces unsweetened chocolate , chopped fine
12 tablespoons unsalted butter (1 1/2 sticks), cut into six 1-inch pieces
2 1/4 cups sugar (15 3/4 ounces)
4 large eggs
1 tablespoon vanilla extract

Instructions
1. Adjust oven rack to middle position; heat oven to 325 degrees. Cut 18-inch length foil and fold lengthwise to 8-inch width. Fit foil into length of 13- by 9-inch baking dish, pushing it into corners and up sides of pan; allow excess to overhang pan edges. Cut 14-inch length foil and, if using extra-wide foil, fold lengthwise to 12-inch width; fit into width of baking pan in same manner, perpendicular to first sheet. Spray foil-lined pan with nonstick cooking spray.

2. If using nuts, spread nuts evenly on rimmed baking sheet and toast in oven until fragrant, 5 to 8 minutes. Set aside to cool.

3. Whisk to combine flour, salt, and baking powder in medium bowl; set aside.

4. Melt chocolate and butter in large heatproof bowl set over saucepan of almost-simmering water, stirring occasionally, until smooth. (Alternatively, in microwave, heat butter and chocolate in large microwave-safe bowl on high for 45 seconds, then stir and heat for 30 seconds more. Stir again, and, if necessary, repeat in 15-second increments; do not let chocolate burn.) When chocolate mixture is completely smooth, remove bowl from saucepan and gradually whisk in sugar. Add eggs one at time, whisking after each addition until thoroughly combined. Whisk in vanilla. Add flour mixture in three additions, folding with rubber spatula until batter is completely smooth and homogeneous.

5. Transfer batter to prepared pan; using spatula, spread batter into corners of pan and smooth surface. Sprinkle toasted nuts (if using) evenly over batter and bake until toothpick or wooden skewer inserted into center of brownies comes out with few moist crumbs attached, 30 to 35 minutes. Cool on wire rack to room temperature, about 2 hours, then remove brownies from pan by lifting foil overhang. Cut brownies into 2-inch squares and serve. (Store leftovers in airtight container at room temperature up to 3 days.)

Posted by: Sallie

Sunday, October 3, 2010

Breakfast Hash


After completing his second marathon, I thought my husband deserved a fantastic breakfast. (Sadly because of a back injury I am still in physical therapy and wasn't able to run this year). Waffles are kind of a Sunday morning tradition but he also requested some kind of breakfast hash. Digging around in my arsenal of cookbooks I spotted a corned beef hash. Not really appetizing to me, but the rest of the recipe sounded delicious.I had some leftover sausage and decided it would be a great substitute.

Chock full of golden brown potatoes, diced onions, bacon, & sausage, this hash was delicious. I was a little leery of adding cream but combined with the hot sauce and topped off with some sunny side up eggs it was perfect. This is a yummy dish I'll be making again. (My family was starving and attacked the hash before I could snap a picture. I did find this one online to give you a good idea of what it will look like.)

Sausage and Potato Breakfast Hash
adapted from The Best Skillet Recipes

2 lbs. russet potatoes (about 4 medium potatoes) peeled, and diced into 1/2 in. pieces
1 medium onion, diced
2 cloves garlic minced or put through a garlic press
4 oz. (about 4 slices) bacon, diced into 1/4 in. pieces
10-12 oz. sausage ,cooked in a separate pan then kept warm until ready to use(I used the kind in a big roll and cooked it like hamburger)
1/3 cup heavy cream
1/4 tsp. hot sauce
1/2 tsp. salt
1/4 tsp. pepper
1 tbsp. olive oil
4 large eggs


Toss the potatoes with the oil, salt and pepper in a microwave safe bowl. Cover the bowl and microwave on high until the potatoes begin to soften, 7-10 minutes, stirring the potatoes halfway through cooking. Drain the potatoes well.

Cook the bacon in a 12 in. nonstick skillet over medium-high heat until the fat begins to render, about 2 minutes. Stir in the onion and cook until softened and lightly browned, about 8 minutes.

Stir in the garlic and cook until fragrant, about 30 seconds. (If there is a lot of grease you can drain it. See note at bottom of recipe.)Stir in the drained potatoes, cream, and hot sauce. Using the back of a spatula, gently pack the potatoes into the pan and cook undisturbed for 2 minutes.Flip the hash, one portion at a time, and lightly repack it into the pan. Repeat the flipping process every few minutes until the potatoes are nicely browned, 6-8 minutes.
Stir in the cooked sausage adn lightly repack the hash into the pan. Make four shallow wells (about 2 inches wide) in the surface of the hash.

Crack 1 egg into each indentation and sprinkle with salt and pepper. Reduce the heat to medium-low, cover, and continue to cook until the eggs are just set, about 5 minutes. Serve immediately. Serves 4-6.

*Note- the recipe didn't call for draining the pan but when i saw the amount of grease after cooking the bacon I drained mine.*
Posted by: Sallie